Workspace
AKVIS Sketch can work independently as a standalone program as well as a plugin to a photo editor.
Standalone is an independent program. You can run it in the usual way.
Plugin is an add-on for graphics editors, for example for Photoshop, AliveColors, and other compatible programs. To call the plugin, select it from filters of your image editing program.
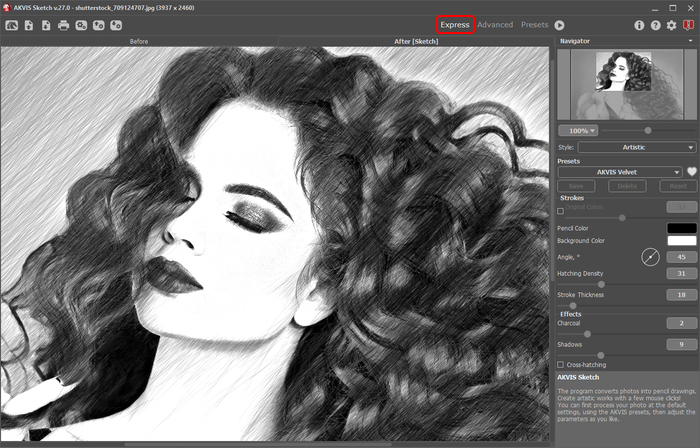
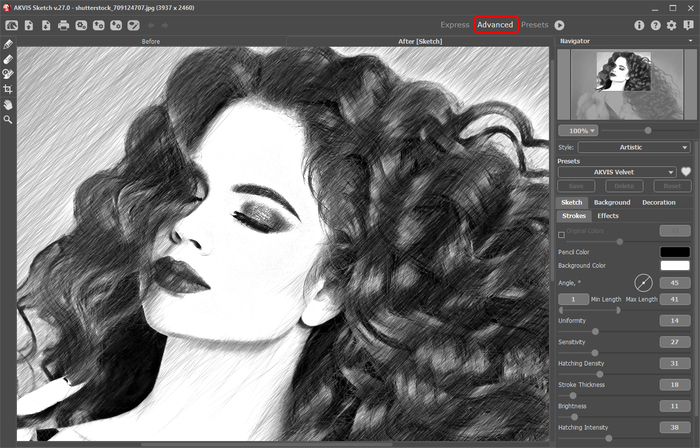
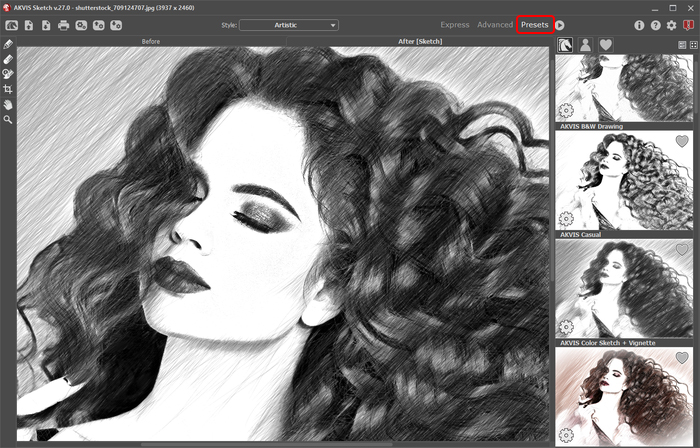
The workspace will be arranged according to the editing mode chosen in the Control Panel: Express, Advanced, or Presets.
In Express mode, the program's interface is extremely simplified. It has the minimal set of parameters needed for a user to quickly obtain a satisfactory result.

Workspace of AKVIS Sketch (Express)
In Advanced mode, the full functionality of the program is available: all parameters, under the relevant tabs Sketch, Background, Decoration, as well as the toolbar.
Note: All features and parameters work in Express mode. Some are hidden and use default values or those of a chosen preset.

Workspace of AKVIS Sketch (Advanced)
The Presets button in the top panel allows you to switch to the visual display mode of presets (Presets Gallery).

AKVIS Sketch Workspace, Presets Mode
The left part of the program's window is taken by the Image Window with two tabs - Before and After. The Before tab shows the original image, the After tab shows the resulting pencil sketch. To switch between the tabs and compare the original and the resulting images, just left-click any point of the image.
In the upper part of the program's window you can see the Control Panel and the following controls:
- The button
 opens the home page of AKVIS Sketch.
- The button
 (only in the standalone version) opens an image for processing. The hot-keys are Ctrl+O on Windows, ⌘+O on Mac.
Right mouse click this button displays the list of recent files. You can change the number of recent documents in the program's preferences. - The button
 (only in the standalone version) saves image to the disk. The hot-keys are Ctrl+S on Windows, ⌘+S on Mac.
- The button
 (only in the standalone version) prints the image. The hot-keys are Ctrl+P on Windows, ⌘+P on Mac.
- The button
 (only in the standalone version) opens the Batch Processing dialog to automatically process a series of images.
- The button
 imports a list of presets (from the .sketch file).
- The button
 exports presets (user settings for the image processing). You can save any number of presets to a separate file with the ending .sketch.
- The button
 /
/  shows/hides the guiding lines and the effect area outlines drawn with the tools.
- The button
 loads saved guiding lines (from the .direction file).
- The button
 saves the guiding lines to a file with the .direction extension.
- The button
 cancels the last operation made with lines (guiding lines and background outlines). It is possible to cancel several operations in a row. The hotkeys are Ctrl+Z, on Windows, ⌘+Z on Mac.
- The button
 returns the last cancelled operation. It is possible to return several operations in a row. The hotkeys are Ctrl+Y on Windows, ⌘+Y on Mac.
- The button
 starts conversion of the original image into a pencil sketch with the current parameter settings. The result is shown in the After tab.
- The button
 (only in the plugin version) applies the result to the image and closes the plugin.
- The button
 calls information about the program.
- The button
 calls the Help files. The hot-key is F1.
- The button
 calls the Preferences dialog box for changing the program's options.
- The button
 opens a window showing the latest news about Sketch.
In the Advanced mode, to the left of the main window there is a Toolbar. Different tools appear depending on the active tab, Before or After.
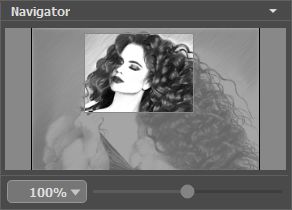
Navigate and scale the image using the Navigator. The frame in the Navigator surrounds the area of the image which is visible in the Image Window; the area outside of the frame will be shaded. The frame can be dragged, thereby changing the visible portion of the image. To move the frame, place the cursor within it, left click the mouse, and then drag.

Navigator
Additionally, you can move the image in the Image Window with the scroll bars or by holding down the space bar, then holding down the left mouse button while moving the mouse. The mouse's scroll wheel can move the image up and down, and holding Ctrl (⌘ in Mac) – while using the scroll wheel will move the image left and right. Holding Alt (Option in Mac) will scale the image. Right-click the scroll bar to activate the quick navigation menu.
Use the slider to scale the image in the Image Window. When you move the slider to the right, the image scale increases. When you move the slider to the left, the image scale reduces.
You can also change the image scale by entering a new coefficient into the scale field and pressing the button Enter (Return in Mac). Frequently used scale coefficients can be found in a drop-down menu.
You can use hot-keys to change the image scale + and Ctrl++ (⌘++ in Mac) to increase the image scale and - and Ctrl+- (⌘+- in Mac) to reduce the scale.
Under the Navigator there is the Settings Panel where you can choose the photo-to-sketch conversion Style (Classic/Artistic/Maestro/Multistyle); and adjust the parameters.
The Settings Panel has three tabs of settings: Sketch, Background, and Decoration.
On the Sketch tab you can adjust the settings for photo-to-sketch conversion of the selected style.
On the Background tab you can define the area of the picture that should be blurred, or the areas that should remain in their original state.
On the Decoration tab you can add text to an image, adjust the canvas surface, and apply a frame.
In the Presets field you can save the current settings as a preset to use them in the future. The current settings can be saved, edited, deleted. When you launch the program, it uses the settings of the last used preset.
Attention! The presets save only information about the settings in the Sketch and Decoration tabs (not Background!).
Under the Settings Panel you can see Hints for the parameters and buttons when you hover over them with the cursor. You can choose where the hints will be shown or hide them in the program's Preferences.
