Pre- and Post-Processing Tools
In AKVIS Coloriage AI, the Toolbar changes when switching between the Before and After tabs, depending on the selected mode AI/Classic, and looks like this:
 |
 |
 |
| Toolbar Before Tab AI Mode |
Toolbar Before Tab Classic Mode |
Toolbar After Tab AI/Classic |
All tools are divided into three groups: the preprocessing tools  ,
,  ,
,  ,
,  ,
,  (available in the Classic mode in the Before tab), post-processing tools
  ,
,  ,
,  ,
,  ,
,  ,
,  (in both AI and Classic modes in the After tab), and additional (auxiliary) tools
  ,
,  ,
,  .
.
The parameters of the selected tool will be shown in a floating window that pops up when you right-click anywhere in the Image Window. The pop-up window disappears if you click outside it.
-
Hint: You can use the buttons
 and
and  (or hotkeys: Ctrl+Z and Ctrl+Y) to undo/redo operations made with the pre- and post-processing tools.
Preprocessing Tools (in the Before tab, Classic mode):
Using these tools, you can set new image colors, indicate areas to colorize and zones that should not change.
Pencil  . Use this tool to draw color strokes and thus set the colors in which the objects in the image will be colorized.
Set the size of the pencil and then outline within the object that you want to colorize in the selected color. If the object is multi-colored, draw the outline within the borders of the area that should be colorized in the selected color.
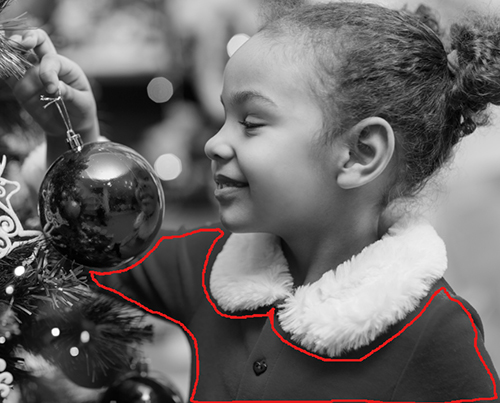
If the object is rather large or there are sharp visible boundaries within it (lighter and darker areas, for example), draw several strokes inside the object.
If there are details inside the object that will be painted in other colors, outline them with the main color of the object. For example, outline lips, eyes, buttons on a coat, etc.
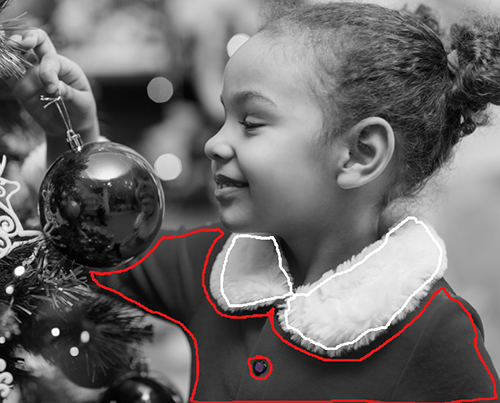
Hint: If you want a smooth transition of color, draw the strokes farther apart from each other (the farther the strokes are apart, the smoother the transition). If the transition needs to be sharper, draw the color strokes closer together. This is why it is necessary, for example, to draw around the eyes and mouth with the color chosen for the skin.
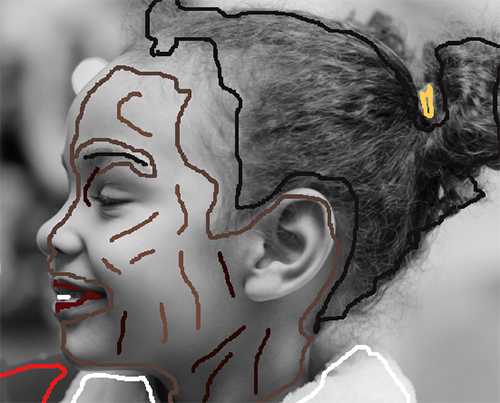
It's possible to draw several colors at once with the Pencil tool using the Multicolor mode (only for Home Deluxe and Business licenses). It's helpful for complex patterns and objects with clear boundaries. This mode appreciably saves you time.
Activate Multicolor mode in the options of the Pencil tool. Upon doing so, the Settings Panel will automatically switch to the Multicolor palette.
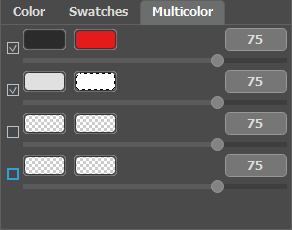
The colors used are set by adding them to color plates. The left plate shows the color that will be replaced, the right plate shows the new color. The colors in the color plates can be set in the following ways:
- from the image (when you click the color plate, the Eyedropper tool becomes active, that allows you to take a color from a photo);
- from the standard Select Color dialog, which is activated by double-clicking the left mouse button on the color plate;
- from the Color Library which contains colors that are difficult to pick out: the color of skin, hair, lips, grass, trees, stones, etc.
You can adjust the Sensitivity for each pair of colors. At higher values of this parameter, more shades of the source color are taken into account when drawing strokes.
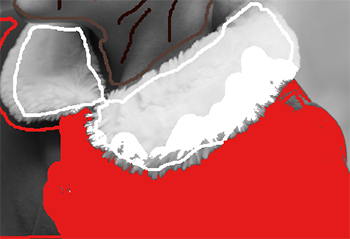
The Sensitivity of the color pairs:
dark-gray — red = 75
light-gray — white = 75
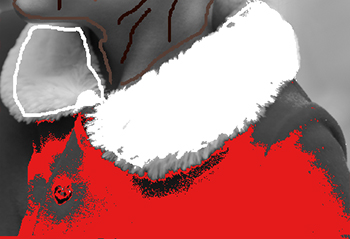
The Sensitivity of the color pairs:
dark-gray — red = 30
light-gray — white = 90
Keep Color Pencil  . Use this protecting tool to mark objects and areas to remain unchanged.
If you want to change the color of a particular object on a color photo while keeping other areas unchanged, use the Pencil tool to set the color for the object and then draw a closed outline around this object using the Keep Color Pencil  .
.
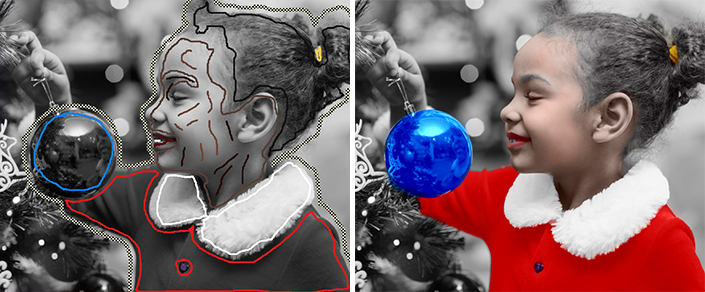
Keep Color Pencil Used
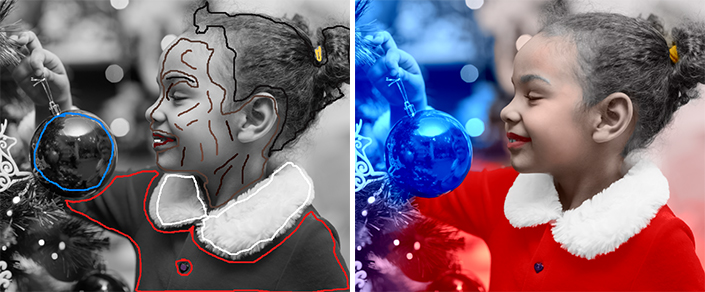
Keep Color Pencil Not Used
Tube  . Use this tool to instantly change the color and brightness range of the drawn stroke.
Magic Tube  . The tool changes at once the color of all strokes with the same color and brightness range.
To change the color of a drawn stroke, select a new color, then enable the Tube tool  in the Toolbar and left-click the stroke. If the image has several strokes of the same color and you want to recolor all these strokes, select the Magic Tube tool
  and click one of the strokes.
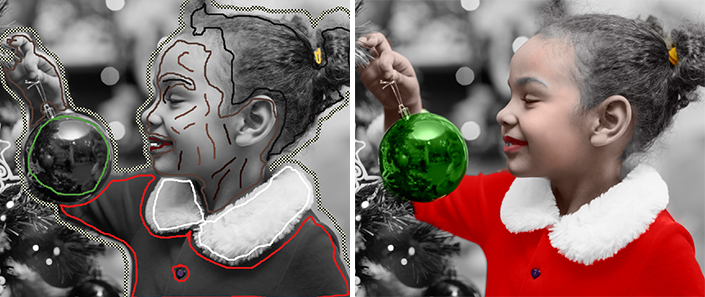
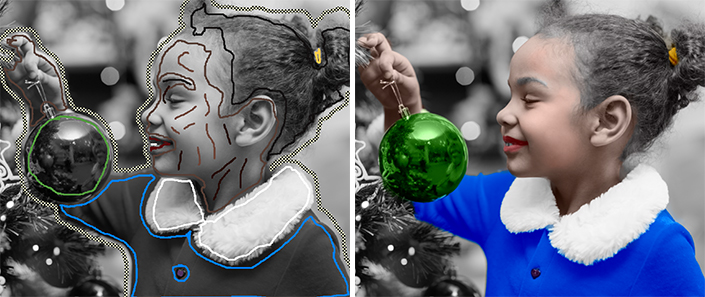
Color Change From Red to Blue
You can make the resulting color darker or lighter. To do this, you need to change the brightness range of the selected color. But keep in mind that the brightness range compression can result in deterioration of the detail and deepness of an image.
To change the brightness range for a drawn stroke, select the required brightness range, take the Tube tool ![]() and left-click this stroke. If you want to recolor strokes having the same color and brightness, select the Magic Tube tool
and left-click this stroke. If you want to recolor strokes having the same color and brightness, select the Magic Tube tool ![]() and left-click one of the strokes. To recolor all strokes having the same color regardless of the brightness range, use this tool with the Ctrl-key pressed on the keyboard (⌘ on Mac).
and left-click one of the strokes. To recolor all strokes having the same color regardless of the brightness range, use this tool with the Ctrl-key pressed on the keyboard (⌘ on Mac).
In the normal preview mode, all strokes are displayed in the chosen color, regardless of the brightness, i.e. various tones of the same color will look the same. When the Brightness Preview  is activated, you can see how the strokes will look on the resulting image.
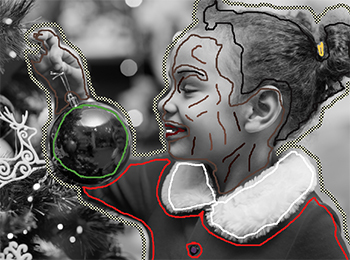
Normal Preview
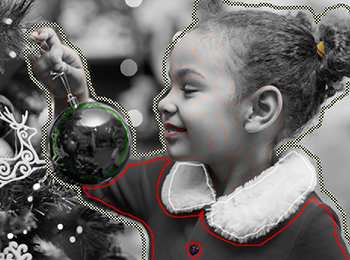
Brightness Preview
Eraser  . Use the tool to erase the drawn strokes. To remove an entire stroke, click it with the Alt key (Mac: Option). To remove all strokes, click the image with Alt+Ctrl (Mac: Option+⌘).
Post-Processing Tools (in the After tab):
Recolor Brush  . The tool allows to change the colors in the colorized image.
Tool's Parameters:
Size (1-500). The stroke width of the brush (in pixels).
Hardness (0-100). The hardness of the outer edge of the brush. The higher the value of the parameter, the harder the brush edge is. At the value = 100% the brush is as hard as a pencil; at a low value of the parameter the brush strokes are soft.
Strength (0-100). The intensity of the strokes. The higher the value of the parameter, the more intense the colors of the applied strokes are.
Keep Brightness check-box. When the check-box is enabled, the brightness of the drawn stroke is changed to comply with the background and with the overall brightness of the image (the strokes get lighter on the light zones of the image and darker on the dark zones). When the check-box is disabled, the brightness of the strokes does not depend on the brightness of the image.
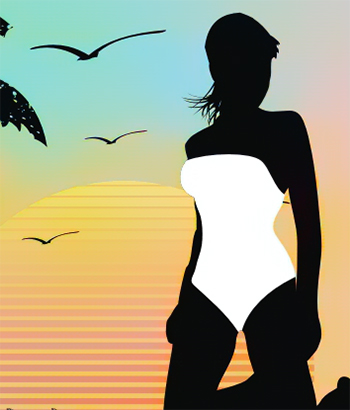
Before Using the Tool
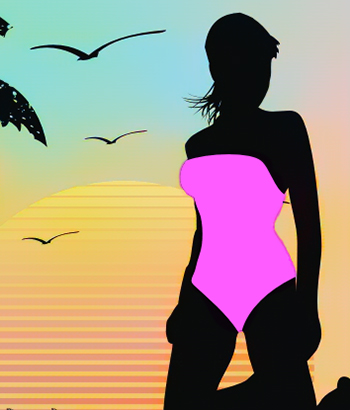
Recolor Brush Applied
Tuning Brush ![]() (only for Home Deluxe and Business licenses). The tool allows you to recolor objects in a natural way, add shades, halftones, and even smooth out folds, wrinkles, and get rid of unnecessary details.
(only for Home Deluxe and Business licenses). The tool allows you to recolor objects in a natural way, add shades, halftones, and even smooth out folds, wrinkles, and get rid of unnecessary details.
Tool's Parameters:
Size (1-200). The diameter of the brush.
Hardness (0-100). The amount of blur of the outer edge of the brush. The higher the value of the parameter, the harder the edge becomes.
Strength (0-100). The amount of influence on an image.
Smoothing Radius (0.1-10.0). At low values, the parameter smoothes out large details. At large values, it smoothes out smaller details and keeps large ones.
Sample (0-100). When set to 0, the brush uses the color from the starting point of the stroke. The higher the value of the parameter, the weaker the original color and the brighter the color from the palette appears. At the value = 100, the original color is not used.
Color Mixing (0-100). The amount of blending with the selected color.
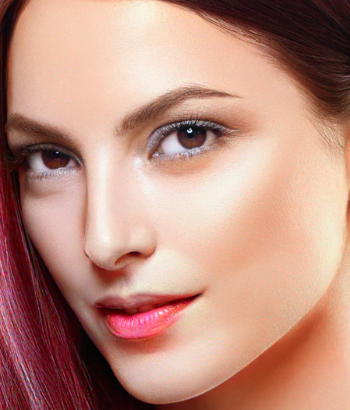
Before Using the Tool
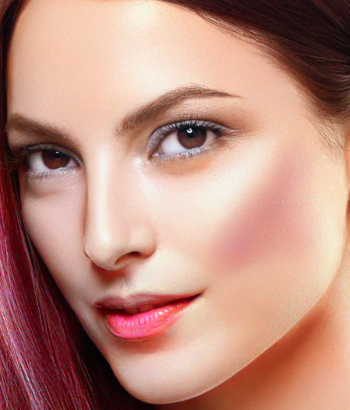
Tuning Brush Applied
History Brush ![]() . The tool restores the image to its original state, weakening or removing the colorization effect on the selected areas.
. The tool restores the image to its original state, weakening or removing the colorization effect on the selected areas.
Tool's Parameters:
Size (1-500). The maximum width of a line made by the brush (in pixels).
Hardness (0-100). The blurriness of the tool's edges. The less the value the more blurry the tool's edges become. At value 100% the border between the brush's edges and the background is very distinct; at lower values the transition between these areas is smoother.
Strength (1-100). The degree of restoration to the original state. At lower values there will be less restoration and more blending with the effect; at value 100% the original image will be restored more completely.
Restore to Original. If the check-box is enabled, the original image is restored. If it is disabled, the tool restores the result of automatic processing.
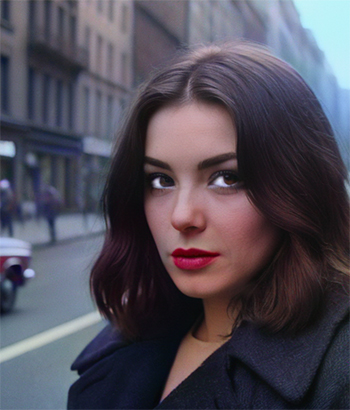
Before Using the Tool
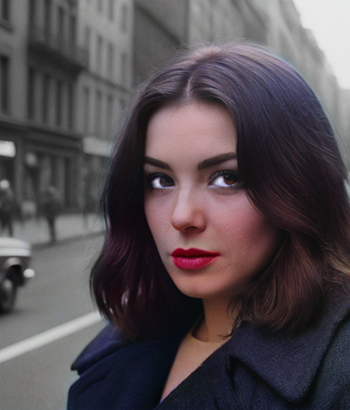
History Brush Applied
Darken  . The tool makes the processed areas darker.
Tool's Parameters:
Size (1-500). The maximum width of a line made by the brush (in pixels).
Hardness (0-100). The degree of blurriness of the tool's edge. The higher the value, the sharper the tool's edges are.
Strength (1-100). The force of influence on the image. The higher the parameter value, the more the colors change.
Range. The drop-down menu provides three methods for darkening an image:
Shadows. Dark areas are processed more strongly than light areas.
Midtones. Dark and light areas are processed equally.
Highlights. Light areas are processed more strongly than dark areas.
Lighten  . The tool makes the processed areas lighter.
Tool's Parameters:
Size (1-500). The maximum width of a line made by the brush (in pixels).
Hardness (0-100). The degree of blurriness of the tool's edge. The higher the value, the sharper the tool's edges are.
Strength (1-100). The force of influence on the image. The higher the parameter value, the more the colors change.
Range. The drop-down menu provides three methods for darkening an image:
Shadows. Dark areas are processed more strongly than light areas.
Midtones. Dark and light areas are processed equally.
Highlights. Light areas are processed more strongly than dark areas.
Saturation  . The tool allows you to change the intensity of colors, making them paler or brighter.
Tool's Parameters:
Size (1-500). The maximum width of a line made by the brush (in pixels).
Hardness (0-100). The degree of blurriness of the tool's edge. The higher the value, the sharper the tool's edges are.
Strength (1-100). The force of influence on the image. The higher the parameter value, the more the colors change.
Mode. In Saturate mode, colors become more saturated, in Desaturate mode, colors become less saturated.
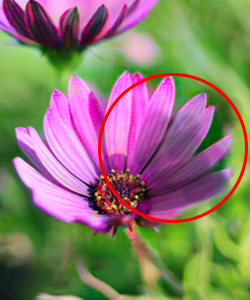
Darken
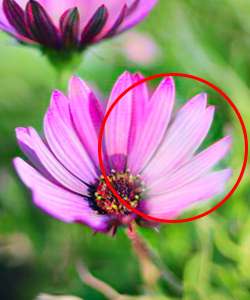
Lighten
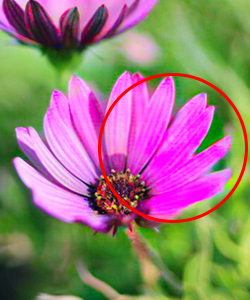
Saturation
Additional Tools:
Eyedropper  . The tool allows you to select colors from the image.
Hand ![]() . The tool lets you scroll the image when it does not fit within Image Window at the desired scale. To use it, click the button, bring the cursor over the image, and while keeping the left mouse button pressed move in the desired direction. The hotkey is H.
. The tool lets you scroll the image when it does not fit within Image Window at the desired scale. To use it, click the button, bring the cursor over the image, and while keeping the left mouse button pressed move in the desired direction. The hotkey is H.
Double-clicking on the tool’s icon ![]() on the Toolbar makes the image fit the window.
on the Toolbar makes the image fit the window.
Zoom ![]() . The tool lets you change the image scale. To zoom in, click the image. To zoom out, click the image with Alt. The hotkey is Z.
. The tool lets you change the image scale. To zoom in, click the image. To zoom out, click the image with Alt. The hotkey is Z.
Double-clicking on the tool’s icon ![]() makes the image scale to 100% (actual size).
makes the image scale to 100% (actual size).
