Workspace
AKVIS Coloriage AI can work independently as a standalone program and as a plug-in to a photo editor.
Standalone is an independent program. You can run it in the usual way.
Plugin is an add-on for image editors. To call the plugin, select it from filters of your image editor.
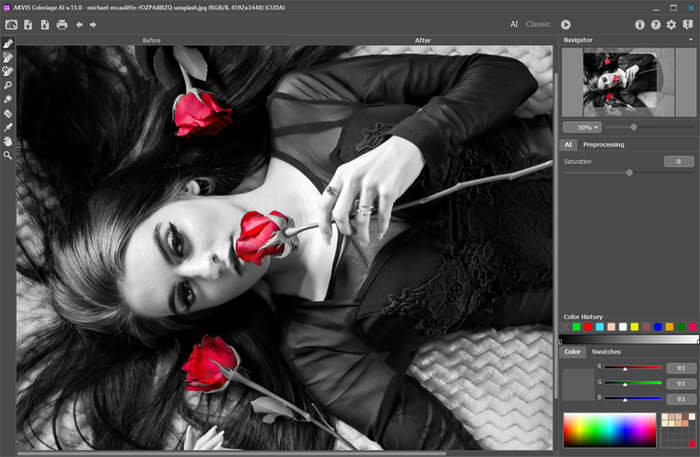
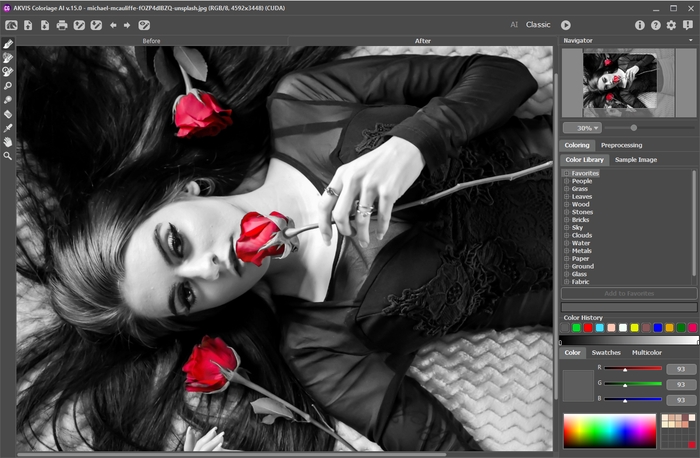
The AKVIS Coloriage AI workspace is arranged according to the image colorization mode chosen in the Control Panel: AI or Classic.
Click AI to switch to the switch to automatic colorization mode that uses neural networks and machine learning algorithms.

Workspace of AKVIS Coloriage AI (AI Mode)
The Classic mode is intended for colorization using with colored strokes and zone selection.

Workspace of AKVIS Coloriage AI (Classic Mode)
Most of the AKVIS Coloriage AI window is taken by the Image Window with two tabs: Before and After. In the Before tab you can see the original photo; the After tab shows the resulting image.
In the upper part of the program's window you can see the Control Panel with the following buttons:
- The button
 opens the home page of AKVIS Coloriage AI.
- The button
 (only in the standalone version) opens an image for processing. The hotkeys for the command are Ctrl+O on Windows, ⌘+O on Mac.
- The button
 (only in the standalone version) saves an image to the disk. The hotkeys are Ctrl+S on Windows, ⌘+S on Mac.
- The button
 (only in the standalone version) prints the image. The hotkeys are Ctrl+P on Windows, ⌘+P on Mac.
- The button
 (only in the AI mode) opens the Batch Processing dialog to automatically colorize a series of images.
These buttons are designed for working with colored strokes and available in the Classic mode:
- The button
 opens files with the .strokes extention. These are the files where you save strokes drawn on an image.
- The button
 saves color strokes drawn on an image into a file with the .strokes extension. It is helpful when you want to edit the photo later, for example, if you have to interrupt your work before you have drawn the strokes for all objects.
- The button
 cancels the last operation. It is possible to cancel several operations in a row. The hotkey for the command is Ctrl+Z on Windows, ⌘+Z on Mac.
- The button
 returns the last cancelled operation. It is possible to return several operations in a row. The hotkey for the command is Ctrl+Y on Windows, ⌘+Y on Mac.
- The button
 /
/  /
/  helps to switch between view modes of the strokes.
 - this state indicates that normal mode is active. All strokes are displayed in the chosen color, i.e. various tones of the same color will look the same.
 - this state indicates that Brightness Preview mode is active. In this mode the strokes are displayed taking into account the brightness of pixels of the original image and the selected brightness range.
 - this state indicates that the strokes are hidden.
These buttons are available in both modes:
- The button
 allows you to start the colorization process. The shortcut to start the image colorization from the keyboard is Ctrl+R on Windows, ⌘+R on Mac. The resulting image is shown in the After tab.
- The button
 (only in the plugin version) applies the result of the colorization. When you press the button, the changes are applied to the image and the AKVIS Coloriage AI window closes.
- The button
 shows information about the program.
- The button
 opens the help files of the program.
- The button
 calls the Preferences dialog box for changing the program's options.
- The button
 opens a window showing the latest news about Coloriage AI.
To the left of the main window there is a Toolbar which contains tools for adding and editing colored strokes (in the Classic mode), as well as tools for fine-tuning the colorized image (in both AI and Classic modes). Different tools appear depending on the active tab, Before or After.
The options of the active tool are shown in the floating window that appears when you right-click any part of the Image Window. If you click outside of the floating window, it disappears.
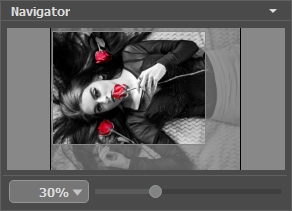
Navigate and scale the image using the Navigator. In the Navigator you can see the reduced copy of the image. The frame shows the part of the image that is now visible in the Image Window; the areas outside the frame will be shaded. Drag the frame to make other parts of the image visible. To move the frame, bring the cursor inside the frame, press the left mouse button and, keeping it pressed, move the frame in the Navigator.

Navigator
Use the slider to scale the image in the Image Window. When you move the slider to the right, the image scale increases. When you move the slider to the left, the image scale decreases.
To scroll the image in the Image Window, you can press the spacebar on the keyboard and drag the image with the left mouse button. Use the scroll wheel of the mouse to move the image up/down, by keeping the Ctrl key pressed (Mac: ⌘) – to the left/to the right, by keeping the Alt key pressed (Mac: Option) − scale the image. Right-click the scroll bar to activate the quick navigation menu.
You can also change the image scale by entering a new coefficient into the scale field and pressing the button Enter (Return in Mac). The drop-down menu shows some frequently used coefficients.
You can use hotkeys to change the image scale + and Ctrl++ (⌘++ in Mac) to increase the image scale and - and Ctrl+- (⌘+- in Mac) to reduce the scale.
Under the Navigator, there is a Settings Panel configured depending on the selected mode.
