Workspace
AKVIS LightShop can work independently as a standalone program as well as a plug-in to a photo editor.
Standalone is an independent program. You can run it in the usual way.
Plugin is an add-on for a photo editor, for example for Photoshop. To call the plugin, select AKVIS –> LightShop from filters of your image editing program.
The workspace view depends on which editing mode is chosen in the Control Panel: Express or Advanced.
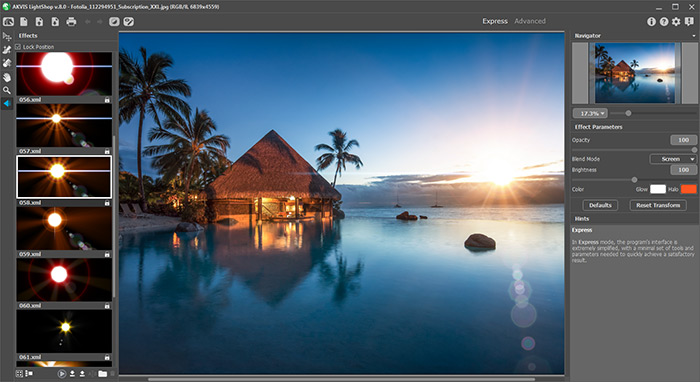
In Express mode, the program's interface is extremely simplified, with a minimal set of parameters needed to quickly achieve a satisfactory result.

AKVIS LightShop Workspace (Express)
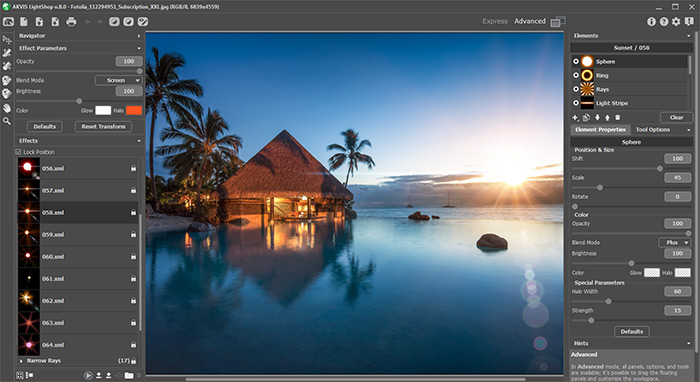
In Advanced mode, all panels, options, and tools are available; it's possible to drag the floating panels and customize the workspace.

AKVIS LightShop Workspace (Advanced)
Most of the program's workspace is taken up by the Image Window, above which is the Control Panel with the following controls:
- The button
 opens the home page of AKVIS LightShop.
- The button
 (only in the standalone version) opens the New Image dialog box. The hot-keys are Ctrl+N on Windows, ⌘+N on Mac.
- The button
 (only in the standalone version) opens an image for processing. The hot-keys are Ctrl+O on Windows, ⌘+O on Mac.
Right mouse click on this button displays the list of recent files. You can change the number of recent documents in the program's preferences. - The button
 (only in the standalone version) saves image to the disk. The hot-keys are Ctrl+S on Windows, ⌘+S on Mac.
- The button
 (only in the standalone version) prints the image. The hot-keys are Ctrl+P on Windows, ⌘+P on Mac.
- The button
 cancels the last operation made with the tools. It is possible to cancel several operations in a row. The hotkey for the command is Ctrl+Z on Windows, ⌘+Z on Mac.
- The button
 returns the last cancelled operation. It is possible to return several operations in a row. The hotkey for the command is Ctrl+Y on Windows, ⌘+Y on Mac.
- The button
 shows/hides the background image. If the background image is invisible, the light effect is displayed on a transparency.
- The button
 (in Advanced mode) shows/hides the protective selection which indicates the areas excluded from the light effect.
- The button
 /
/  turns the effect on/off.
- The button
 (in Advanced mode) shows the menu that lets managing the program's workspace and the list of the saved workspaces. You can customize your workspace by moving the panels, save it, and switch between the workspaces using the commands in this menu.
Reset - it restores the state of the workspace that was active when launching the program;
Default - it restores the default program's workspace;
Save - it saves the current states of the workspace;
Delete - it removes the selected workspace.
- The button
 (only in the plugin version) applies the result to the image and closes the plugin.
- The button
 calls information about the program.
- The button
 calls the Help files. The hot-key is F1.
- The button
 calls the Preferences dialog box for changing the program’s options.
- The button
 opens a window showing the latest news about LightShop.
There are these floating panels in the program: Navigator, Toolbar, Effects, Effect Parameters, Elements, Element Properties, Tool Options, and Hints. In Advanced mode, all these panels are available, you can drag them in any position, combine with other panels, scale them or minimize. In Express mode, some of the panels are hidden.
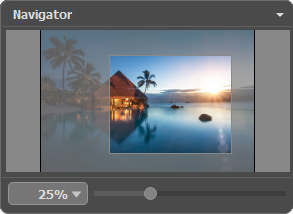
Navigate and scale the image using the Navigator. The frame in the Navigator surrounds the area of the image which is visible in the Image Window; the area outside of the frame will be shaded. The frame can be dragged, thereby changing the visible portion of the image. To move the frame, place the cursor within it, left click the mouse, and then drag.

Navigator
Use the slider to scale the image in the Image Window. When you move the slider to the right, the image scale increases. When you move the slider to the left, the image scale decreases.
To scroll the image in the Image Window you can press the spacebar on the keyboard and drag the image with the left mouse button. Use the scroll wheel of the mouse to move the image up/down, by keeping the Ctrl key pressed (Mac: ⌘) – to the left/to the right, by keeping the Alt key pressed (Mac: Option) − scale the image. Right-click the scroll bar to activate the quick navigation menu.
You can also change the image scale by entering a new coefficient into the scale field and pressing the button Enter (Return in Mac). The drop-down menu shows some frequently used coefficients.
You can use hot-keys to change the image scale + and Ctrl++ (⌘++ in Mac) to increase the image scale and - and Ctrl+- (⌘+- in Mac) to reduce the scale.
The Hints panel displays the descriptions of the parameters and buttons when you hover over them with the cursor.
