Workspace
AKVIS Refocus AI can work independently as a standalone program or as a plugin to a photo editor.
Standalone is an independent program. You can run it in the usual way.
Plugin is an add-on for graphics editors, for example for Photoshop, AliveColors, and other compatible programs. To call the plugin, select it from filters of your image editing program.
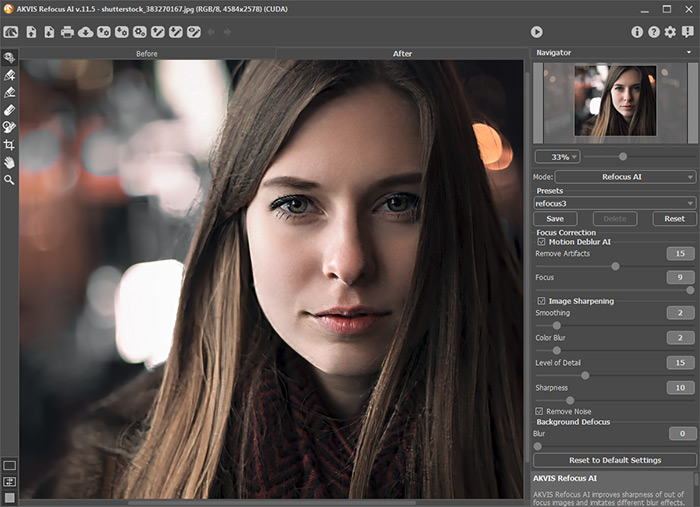
The AKVIS Refocus AI workspace looks like this:

The left part of the program's window is taken by the Image Window with two tabs: Before and After. In the Before tab the original image is shown, while in the After tab you can see the processed image. You can switch between the windows by clicking on a tab with the left mouse button.
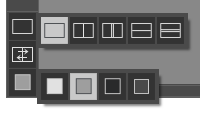
You can select how Image Window and Before/After tabs will be shown by adjusting the View Modes in the bottom part of the left panel.

In the upper part of the program's window you can see the Control Panel with the following buttons:
- The button
 opens the home page of AKVIS Refocus AI.
- The button
 (only in the standalone program) opens image for processing. The hot-keys for the command are Ctrl+O on Windows, ⌘+O on Mac.
- The button
 (only in the standalone version) saves image to the disk. The hot-keys are Ctrl+S on Windows, ⌘+S on Mac.
- The button
 (only in the standalone program) opens the Print dialog. The hot-keys are Ctrl+P on Windows, ⌘+P on Mac.
- The button
 imports a list of presets (from the .refocus file).
- The button
 exports presets (user settings for the image processing). You can save any number of presets to a separate file with the ending .refocus.
- The button
 (only in the standalone program) opens the Batch Processing dialog to automatically process a series of images.
- The button
 opens files with the .refstrokes extention. These are the files where you save strokes drawn on an image.
- The button
 saves strokes drawn on an image into a file with the .refstrokes extension. It is helpful when you want to edit the photo later.
- The button
 /
/  turns on/off the drawn strokes.
- The button
 cancels the last operation made with the pencils in Refocus AI mode. It is possible to cancel several operations in a row. The hotkeys are Ctrl+Z on Windows, ⌘+Z on Mac.
- The button
 returns the last cancelled operation. It is possible to return several operations in a row. The hotkeys are Ctrl+Y on Windows, ⌘+Y on Mac.
- The button
 starts image processing. Use hot-keys: Ctrl+R on Windows, ⌘+R on Mac.
- The button
 (only in the plugin version) applies the result to the image and closes the plugin.
- The button
 calls information about the program and opens the registration window.
- The button
 calls the Help files. The hot-key is F1.
- The button
 calls the Preferences dialog box for changing the program's options.
- The button
 opens a window showing the latest news about Refocus AI.
Тo the left of the Image Window there is the Toolbar. The tool's parameters are shown in the Settings Panel and in pop-up box after right-clicking in the image window.
- The button
 activates the History Brush tool which lets you fade the effect and restore the image, partially or fully, to its original state.
- In the standalone version, before applying the effect, you can cut off unwanted areas of the picture and improve its composition with the Crop tool
 .
.
Refocus AI Mode, Motion Blur, Radial Blur:
- The button
 switches on/off the quick preview area (in Refocus AI mode).
- The buttons
 and
and  (available only for Home Deluxe and Business licenses) activate the special tools which are used to select processing areas.
With the blue strokes
 indicate the focus area, where you want to preserve or increase the sharpness.
Use red strokes
 to mark background objects. You can blur this area using blur modes.
- The button
 activates the Eraser tool used to erase strokes drawn with the pencils.
Iris Blur and Tilt-Shift Modes:
- The button
 activates the Blur Area tool that lets adjusting blur effect areas.
Additional Tools:
- The button
 activates the Hand tool which allows you to scroll the image when it does not fit within the main window at the desired scale. To use it click on the button, bring the cursor over the image, and while keeping the left mouse button pressed move in the desired direction.
Double-clicking on the tool's icon makes the image fit the window.
- The button
 activates the Zoom tool, which changes the image's scale. To zoom in left click on the image. To zoom out left click with Alt on the image. Press Z to quickly access the tool.
Double-clicking on the tool's icon makes the image scale to 100% (actual size).
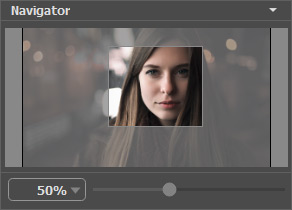
Navigate and scale the image using the Navigator. Here you can see the reduced copy of the image. The red frame shows the part of the image that is now visible in the main window; the areas outside the frame will be shaded. Drag the frame to make other parts of the image visible. To move the frame, bring the cursor inside the frame, press the left mouse button and, keeping it pressed, move the frame in the Navigator.

Additionally, you can move the image in the main window with the scroll bars or by holding down the space bar, then holding down the left mouse button while moving the mouse. The mouse's scroll wheel can move the image up and down, and holding Ctrl on Windows, ⌘ on Mac – while using the scroll wheel will move the image left and right. Holding Alt on Windows, Option on Mac will scale the image. Right-click on the scroll bar to activate the quick navigation menu.
Use the slider to scale the image in the window. When moving the slider to the right, the image scale increases; when moving it to the left, the image scale reduces.
You can also change the image scale by entering a new coefficient into the scale field. Frequently used scale coefficients can be found in a drop-down menu.
You can use hot-keys to change the image scale + and Ctrl++ on Windows, ⌘++ on Mac to increase the image scale and - and Ctrl+- on Windows, ⌘+- on Mac to reduce the scale.
Below the Navigator is the Settings Panel where you can select a mode and adjust its settings.
In the Presets field you can save favorite settings as a preset to use them in the future. When you launch the program, it uses the settings of the last used preset.
Under the Settings Panel you can see Hints for the parameters and buttons when you hover over them with the cursor. You can choose where the hints will be shown or hide them in the program's Preferences.
