Workspace
AKVIS MultiBrush can work independently as a standalone program as well as a plug-in to a photo editor.
Standalone is an independent program; you can open it by clicking on the program’s icon.
To launch the standalone version of AKVIS MultiBrush follow the instructions:
On a Windows computer - select it from the Start menu or use the program’s shortcut.
On a Mac computer - launch the app from the Applications folder.
Plugin is an add-on for a photo editor, for example for Photoshop.
To call the plugin, select it from filters of your image editing program.
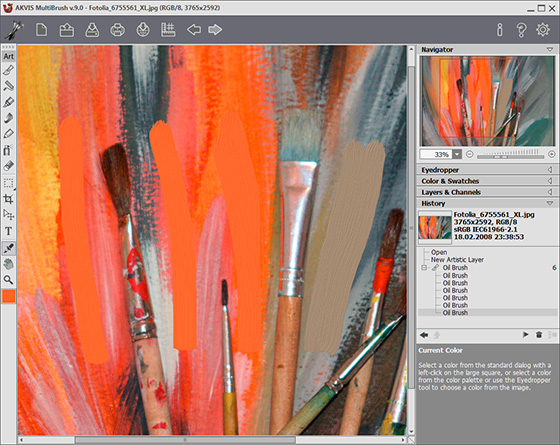
Under Windows the AKVIS MultiBrush program window looks like this:

Workspace of AKVIS MultiBrush
The central part of the AKVIS MultiBrush window is taken by the Image Window. Right-clicking in the Image Window calls the settings of the selected tool.
In the upper part of the program’s window you can see the Control Panel with following buttons:
-
The button
 opens the home page of AKVIS MultiBrush.
-
The button
 (only in the standalone version) creates a new file. The hot key for this operation is Ctrl+N (⌘+N on Mac).
-
The button
 (only in the standalone version) opens an image for processing. The hot key for this operation is Ctrl+O (⌘+O on Mac).
Right mouse click on this button displays the list of recent files. You can change the number of recent documents in the program’s preferences.
-
The button
 (only in the standalone version) saves an image to the disk. The hot key for this operation is Ctrl+S (⌘+S on Mac).
-
The button
 (only in the standalone version) prints the image. The hot key for this operation is Ctrl+P (⌘+P on Mac).
-
The button
 lets posting pictures from the program to the social networks: Twitter, Flickr, Google+, Dropbox.
-
The button
 shows/hides the alignment tools menu (guidelines, rulers, grids).
-
The button
 cancels the last action.
If you press this button several times, you can cancel several actions. The hot key for this operation is Ctrl+Z (⌘+Z on Mac).
-
The button
 restores changes canceled by the action
  . The hot key for this operation is Ctrl+Y (⌘+Y on Mac).
-
The button
 (only in the plugin version) applies the result to the image and closes the plugin.
-
The button
 shows information about the program.
-
The button
 opens the help files of the program. The hot-key is F1.
-
The button
 opens the Preferences dialog box for changing the program’s options.
At the left side of the Image Window there is the Toolbar. Tools are grouped in sets for convenience: Standard (available when working with a raster layer) and Artistic (available when working with an artistic layer). To quickly switch between the tool sets, use the hot key Q.
Parameters for the selected tool will be shown in a floating box over the Image Window (by right-clicking the mouse) and in the Settings Panel.
Under the tools in the Toolbar there is the color square with the current color. Click on it to open the Select Color dialog box and change the color.
On the right side of the program’s window you can see these sections:
- Navigator;
- Tools options;
- Swatches and Color palettes,
- Layers and Channels palettes,
- History palette;
- Hints
You can hide/show a section by clicking on its title.

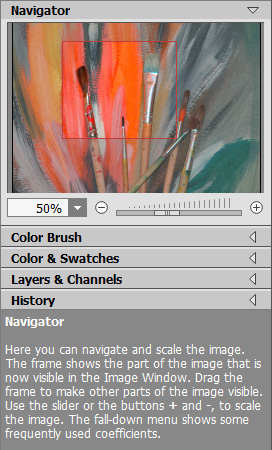
Navigator
Navigate and scale the image using the Navigator. With Navigator you can see the reduced copy of the image. The frame shows the part of the image that is now visible in the Image Window; the areas outside the frame will be shaded. Drag the frame to make other parts of the image visible. To move the frame, bring the cursor inside the frame, press the left mouse button and, keeping it pressed, move the frame in Navigator.
To scroll the image in the Image Window you can press the spacebar on the keyboard and drag the image with the left mouse button. Use the scroll wheel of the mouse to move the image up/down, by keeping the Ctrl (⌘ on Mac) key pressed – to the left/to the right, by keeping the Alt (Option on Mac) key pressed − scale the image. Right-click on the scroll bar to activate the quick navigation menu.
Use the slider or the buttons ![]() and
and ![]() , to scale the image in the Image Window. When you click on the
, to scale the image in the Image Window. When you click on the ![]() button or move the slider to the right, the image scale increases. When you click on the
button or move the slider to the right, the image scale increases. When you click on the ![]() button or move the slider to the left, the image scale reduces.
button or move the slider to the left, the image scale reduces.
You can also change the image scale by entering a new coefficient into the scale field and pressing the button Enter (Return on Mac). The fall-down menu shows some frequently used coefficients.
You can use hot-keys to change the image scale + and Ctrl++ (⌘++ on Mac) to increase the image scale and - and Ctrl+- (⌘+- on Mac) to reduce the scale.
Under the Navigator there is the Settings Panel which offers the options for the selected tool and below the palettes: Color and Swatches (grouped together), Layers and Channels (which are grouped as well), and History. You can change the order of the palettes within a group by dragging them with the left button. History and Channels palettes are available in Home Deluxe and Business versions only.
Under the Settings Panel you can see Hints for the parameters and buttons when you hover over them with the cursor. You can show/hide the Hints section in Preferences.