Creating a New Image
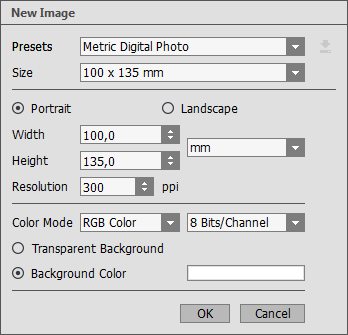
This is the New Image dialog window:

"New Image" Dialog Window
The Presets drop-down menu contains the standard file types which are used in printing or working on the internet. The Size menu shows the sizes available for this preset. All other parameters of the preset will be configured automatically. Typically, the preset will have a Portrait orientation, and the Background Color of the document will be white.
Any changes made to a preset’s parameters will change name on the drop-down menu to Custom, and the Save Custom Preset button ![]() next to it will become active. Press this button to save the current settings. A preset will be automatically assigned a name which can be changed in the illuminated field by entering any combination of letters and numbers. After pressing Enter a new preset will appear in the list. Any user preset can be deleted by selecting it and pressing the Delete custom preset
next to it will become active. Press this button to save the current settings. A preset will be automatically assigned a name which can be changed in the illuminated field by entering any combination of letters and numbers. After pressing Enter a new preset will appear in the list. Any user preset can be deleted by selecting it and pressing the Delete custom preset ![]() button.
button.
There are two possible orientations for a document - Portrait and Landscape. In Landscape an image is oriented horizontally (width is greater than height), while in Portrait it is oriented vertically (height is greater than width).
The size of the document can be set manually in the Width and Height fields. Units are listed in a drop-down list (pixels, inches, centimeters, millimeters, points, and picas).
The Resolution parameter specifies the density of pixels in an image (level of detail) and calculates the number of pixels per inch (ppi).
In Color Mode you can choose from one of the following color schemes: Grayscale, RGB, CMYK and Lab. The modes differ in how they handle color. After the color model has been defined, choose the color depth from the adjacent list: 8 Bits/Channel, 16 Bits/Channel or 32 Bits/Channel.
The Transparent Background option assigns a transparent background to the image, while the Background Color option allows the image to be filled with an opaque background color (the default is white). The color is selected in the Select Color dialog, which is activated by double-clicking on the adjacent color bar.