How it Works
AKVIS MultiBrush can work independently as a standalone program and as a plug-in to a photo editor.
Follow the instructions below:
-
Step 1. Open an image or create a new image.
- If you work with the standalone edition:
Run the standalone edition of AKVIS MultiBrush.
To open an image in the program, you can double-click in the empty workspace of MultiBrush or drag the image into the workspace, or press
 on the Control Panel.
The program supports BMP, JPEG, PNG, TIFF, PSD, and AKVIS file formats.
- If you work with the plugin:
Run your photo editor. The MultiBrush plugin is compatible with Adobe Photoshop, Adobe Photoshop Elements, Corel Paint Shop Pro, and many other image editors.
Open an image in your photo editor by calling the command File -> Open or using the key combination Ctrl+O (⌘+O on Mac).
Then call the AKVIS MultiBrush plug-in in the Filter/Effects menu of the photo editor. For example, in Adobe Photoshop select the menu item Filter -> AKVIS -> MultiBrush; in Paint Shop Pro select the menu item Effects –> Plugins -> AKVIS –> MultiBrush; in Corel Photo-Paint select the menu item Effects -> AKVIS -> MultiBrush.

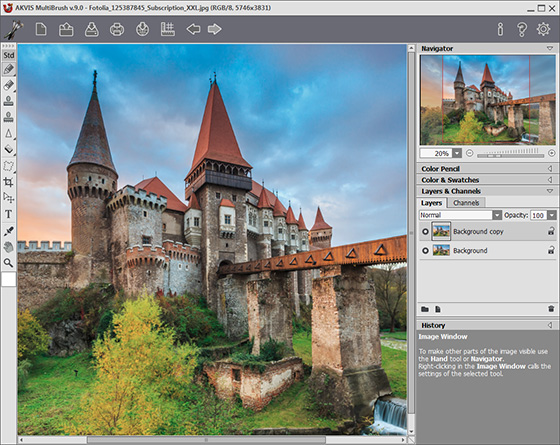
The AKVIS MultiBrush window -
Step 2. Use the editing tools in the Toolbar to process the image (to learn how to use the editing tools in more detail, look at the examples).

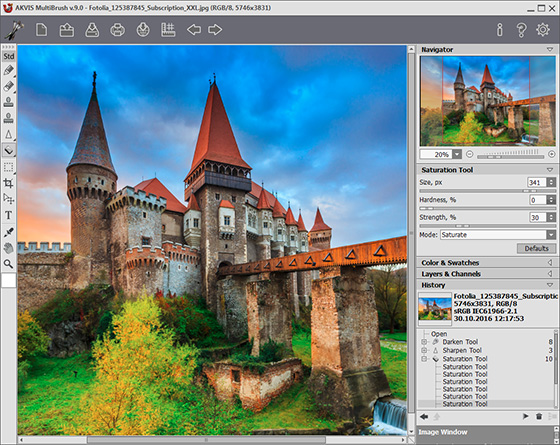
Editing the image -
Step 3. Share your drawing by clicking on
 . It opens the list of the services where you can publish the image: Twitter, Flickr, Google+, Dropbox.
In the standalone version, you can also print your result using
 .
.
-
Step 4. Save the processed image.
- If you work with the standalone edition:
Click on the button
 to open the Save as dialog box. Enter a name for the file, choose the format (TIFF, BMP, JPEG, PNG, PSD, or AKVIS) and indicate the target folder.
- If you work with the plugin:
Apply the result by pressing
 . The AKVIS MultiBrush plugin will close and the picture will appear in the workspace of the photo editor.
Call the Save As dialog box using the command File -> Save As, enter a name for the file, choose the format and indicate the target folder.
Note: Use AKVIS format to be able to continue working with multi-layer file with all checkpoints and layers (raster, artistic, and text layers) without merging or rasterizing them. You can save the final result using JPG, TIFF, PNG formats, to be able to share it.