Alignment Tools
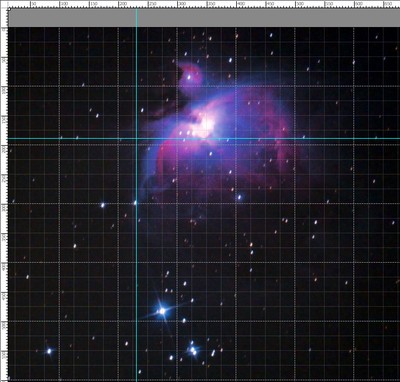
Use the alignment tools to move and precisely position objects (layers). Rulers are shown along the edges of the Image Window. Guidelines (as well as the Grid) are nonprinting supporting horizontal and vertical lines which are displayed over the image (they will not appear on the final result).
To create a horizontal/vertical guideline, place a cursor over a corresponding ruler, and holding the left mouse button, drag a blue line which appears under the cursor.
You can move the guidelines with the Move tool ![]() (the cursor will turn into
(the cursor will turn into ![]() ).
).

Guidelines
To remove the guideline, drag it outside of the Image Window.
Click on the button ![]() in the top panel to open the alignment tools menu:
in the top panel to open the alignment tools menu:

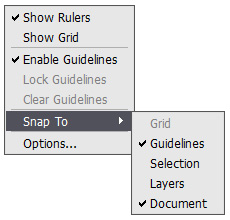
- Show Rulers. When this option is enabled, you can see the rulers along the edges of the Image Window. Right mouse clicking on a ruler lets you select the units of measurement (pixels, inches, centimeters, etc.).
Marks on the rulers indicate the position of the cursor.
To change the origin (zero), place the cursor over the intersection of the rulers in the upper left corner of the Image Window and drag diagonally to the desired point in the image. To restore the default origin, double-click this corner.
- Show Grid. When this option is checked, the grid appears over the image. The grid's point of origin depends on the rulers origin.
- Enable Guidelines. When this option is checked, the guidelines are shown. When the option is deactivated, the guidelines are not displayed, cannot be created and cannot be used for snapping.
- Lock Guidelines. This option prevents repositioning the guidelines.
- Clear Guidelines. This command deletes all guidelines.
- Snap To. This feature helps to precisely position the object which "clings", when moving, to the edge of a selected element. You can specify elements to which to snap (they must be visible):
- Grid;
- Guidelines;
- Selection;
- Layers;
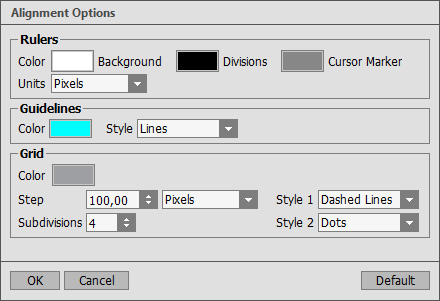
- Document. - Options. This command opens the dialog box where you can adjust the display options for the alignment tools.

There are three groups of the preferences:
-
Rulers:
Color for each element of the rulers can be changed by clicking on the corresponding color square:
- Background.
- Divisions.
- Cursor Marker.Units of measurement can be changed here, in the drop-down list, or with a right mouse click on a ruler.
-
Guidelines:
Color of the guidelines can be selected by clicking on the color square.
Style defines a display option for the guidelines (Lines, Dashed Lines, Dots).
-
Grid:
The grid consists of the main lines and the additional lines (subdivisions).
Color of the grid lines can be changed by clicking on the color square.
Step adjusts the grid spacing between the major lines. You can change units for this option.
Subdivisions - this option defines the spacing for the minor lines.
You can adjust a view mode for the grid lines (Lines, Dashed Lines, Dots).
There are two drop-down lists for each type of the lines: Style 1 is used for the main lines, Style 2 - for the subdivision lines.
-
Rulers: