Workspace
AKVIS Decorator can work independently as a standalone program or as a plug-in to a photo editor.
Standalone is an independent program. You can run it in the usual way.
Plugin is an add-on for graphics editors, for example for Photoshop, AliveColors, and other compatible programs. To call the plugin, select it from filters of your image editing program.
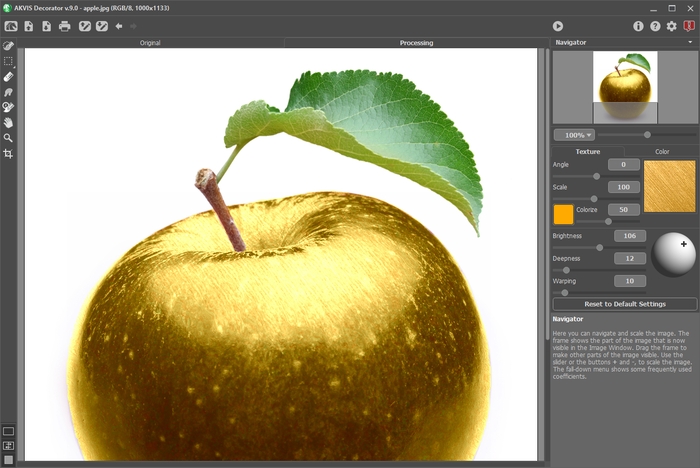
AKVIS Decorator's workspace looks like this:

Most of AKVIS Decorator's workspace is taken by the Image Window with two tabs Original and Processing. All operations are performed in the Processing tab. You can switch between the windows by left-clicking on the tab with the mouse button. To compare the original and the resulting images, click on the image and hold the button pressed - the program will then switch between tabs.
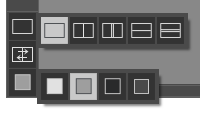
You can select how Image Window and Original/Processing tabs will be shown by adjusting the View Modes in the bottom part of the left panel.

The Control Panel has the following controls:
- The button
 opens the home page of AKVIS Decorator.
- The button
 (only in the standalone version) opens the image for processing. The hot-keys are Ctrl+O on Windows, ⌘+O on Mac.
- The button
 (only in the standalone version) saves the image to the disk. The hot-keys are Ctrl+S on Windows, ⌘+S on Mac.
- The button
 (only in the standalone) opens the Print dialog to print the result. The hot-keys are Ctrl+P on Windows, ⌘+P on Mac.
- The button
 loads selected areas that have been saved to a file (.decor).
 - The button
 saves selected areas to a separate file in the .decor format.
 - The button
 cancels the last action. If it is pressed multiple times, it will cancel several previous actions. This can also be activated with the keyboard, by pressing Ctrl+Z on Windows, ⌘+Z on Mac.
- The button
 restores an action cancelled by
  .
.
An action can also be restored with the keyboard, by pressing Ctrl+Y on Windows, ⌘+Y on Mac. - The button
 initiates image processing with the current settings. The hot-keys are Ctrl+R on Windows, ⌘+R on Mac.
- The button
 (only in the plugin version) applies the result to the image and closes the program window of AKVIS Decorator.
- The button
 calls information about the program and opens the registration window.
- The button
 calls the Help files. The hot-key is F1.
- The button
 calls the Preferences dialog box for changing the program's options.
- The button
 opens a window showing the latest news about Decorator.
To the left of the Image Window is the Toolbar.
The tools' parameters are shown in the Settings Panel or in a pop-up box after right-clicking in the image window.
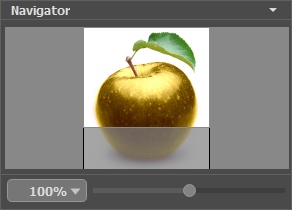
Navigate and scale the image using the Navigator. In the Navigator you can see the reduced copy of the image. The red frame shows the part of the image that is now visible in the Image Window; the areas outside the frame will be shaded. Drag the frame to make other parts of the image visible. To move the frame, bring the cursor inside the frame, press the left mouse button and, keeping it pressed, move the frame in the Navigator.

Additionally, you can move the image in the Image Window with the scroll bars or by holding down the space bar, then holding down the left mouse button while moving the mouse. The mouse's scroll wheel can move the image up and down, and holding Ctrl (⌘ in Mac) - while using the scroll wheel will move the image left and right. Holding Alt (Option in Mac) will scale the image. Right-click on the scroll bar to activate the quick navigation menu.
Use the slider to scale the image in the Image Window. When you move the slider to the right, the image scale increases. When you move the slider to the left, the image scale decreases.
You can also change the image scale by entering a new coefficient into the scale field and pressing the button Enter (Return in Mac). Frequently used scale coefficients can be found in a drop-down menu.
You can use hot-keys to change the image scale + and Ctrl++ (⌘++ in Mac) to increase the image scale and - and Ctrl+- (⌘+- in Mac) to reduce the scale.
Under the Navigator is the Settings Panel where you can adjust the texture, its color, the overlay parameters, the light source on the image.
The button Reset to Default Settings below the settings restores the default values of the parameters.
Under the Settings Panel you can see Hints for the parameters and buttons when you hover over them with the cursor. You can choose where the hints will be shown or hide them in the program's Preferences.
