Workspace
AKVIS Magnifier AI can work independently as a standalone program as well as a plugin in Adobe Photoshop and Photoshop Elements.
- Standalone is an independent program. You can run it in the usual way.
- Plugin is an add-on for graphics editors. Magnifier AI works with Adobe Photoshop and Photoshop Elements. It supports the automation function and can be find in Automate menu of Photoshop, in the Automation Tools of Photoshop Elements (unlike other AKVIS plugins, which are available in the Filter menu). The layers must be merged before calling the plugin.
Windows-version: When you first start the program, if a computer allows, a message will appear about the possibility to download and install the CUDA module for working with neural networks.

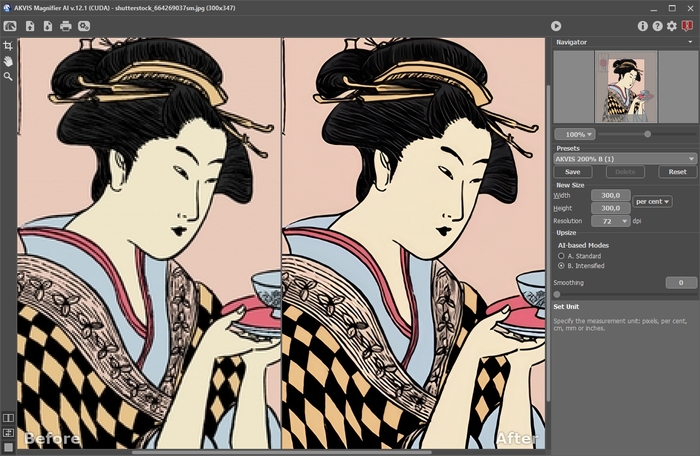
The AKVIS Magnifier AI workspace looks like this:

Workspace of AKVIS Magnifier AI
Parts of the program's window:
The left part of AKVIS Magnifier AI’s workspace is taken by the Image Window with two tabs Before and After. The Before tab displays the original image, the After tab shows the result. You can compare the original and the resulting images by just left-clicking on any point of the image.
You can select how Image Window and Before/After tabs will be shown by adjusting the View Modes in the bottom part of the left panel.
Attention! When switching between the tabs you can notice a slight distortion of the image proportions. This visual effect is a result of simultaneous scaling of two images; it will have no influence on the final result. To minimize this effect, it is recommended to work with images using certain scales (50%, 100%, 150% etc).
In the upper part of the program's window you can see the Control Panel with the following buttons:
- The button
 opens the home page of AKVIS Magnifier AI.
- The button
 (only in the standalone version) opens an image for processing. Right mouse click on this button displays the list of recent files. You can change the number of recent documents in the Preferences dialog box. The hot keys are Ctrl+O on Windows, ⌘+O on Mac.
- The button
 (only in the standalone version) saves the image to the disk. The hot keys are Ctrl+S on Windows, ⌘+S on Mac.
- The button
 (only in the standalone version) prints the image. The hot keys are Ctrl+P on Windows, ⌘+P on Mac.
- The button
 (only in the standalone version) opens the Batch Processing dialog to automatically process a series of images.
- The button
 initiates image processing with specified set of parameters.
- The button
 (only in the plugin version) applies the result. When you press the button, the changes are applied to the image and the plugin's window closes.
- The button
 calls information about the program.
- The button
 calls help files to the program. The hot key for this operation is F1.
- The button
 calls the Preferences dialog box for changing the program's options.
- The button
 opens a window showing the latest news about Magnifier AI.
Тo the left of the Image Window there is the Toolbar with these tools:
- The button
 (only in the standalone version) activates the Crop tool which allows cutting off unwanted areas in the image.
- The button
 activates the Hand tool which allows you to scroll the image when it does not fit within Image Window at the desired scale. To use it click on the button, bring the cursor over the image, and while keeping the left mouse button pressed move in the desired direction.
Double-clicking on the tool's icon
 on the Toolbar makes the image fit the Image Window.
- The button
 activates the Zoom tool, which changes the image's scale. To zoom in left click on the image. To zoom out left click with Alt on the image. Press Z to quickly access the tool.
Double-clicking on the tool's icon
 on the Toolbar makes the image scale to 100% (actual size).
And below, there are three buttons which control how the Image Window looks like.
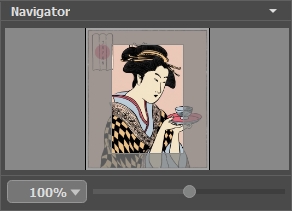
Navigate and scale the image using the Navigator. In the Navigator you can see the reduced copy of the image. The red frame shows the part of the image that is now visible in the Image Window; the areas outside the frame will be shaded. Drag the frame to make other parts of the image visible. To move the frame, bring the cursor inside the frame, press the left mouse button and, keeping it pressed, move the frame in the Navigator.

Navigator
Additionally, you can move the image in the Image Window with the scroll bars or by holding down the space bar, then holding down the left mouse button while moving the mouse. The mouse's scroll wheel can move the image up and down, and holding Ctrl on Windows, ⌘ on Mac – while using the scroll wheel will move the image left and right. Holding Alt on Windows, Option on Mac will scale the image. Right-click on the scroll bar to activate the quick navigation menu.
Use the slider to scale the image in the Image Window. When you move the slider to the right, the image scale increases. When you move the slider to the left, the image scale reduces.
You can also change the image scale by entering a new coefficient into the scale field. The fall-down menu shows some frequently used coefficients.
You can use hot-keys to change the image scale + and Ctrl++ (⌘++ in Mac) to increase the image scale and - and Ctrl+- (⌘+- in Mac) to reduce the scale.
Under the Navigator there is a Settings Panel with parameters of advanced image processing.
In the Presets field you can save the current settings as a preset to use them in the future. When you launch the program, it uses the settings of the last used preset.
Under the Settings Panel you can see Hints for the parameters and buttons when you hover over them with the cursor. You can choose where the hints will be shown or hide them in the program's Preferences.
