Creating HDR Images
This tutorial explains how to use AKVIS HDRFactory to obtain an HDR-image from a series of shots taken with different exposure settings.
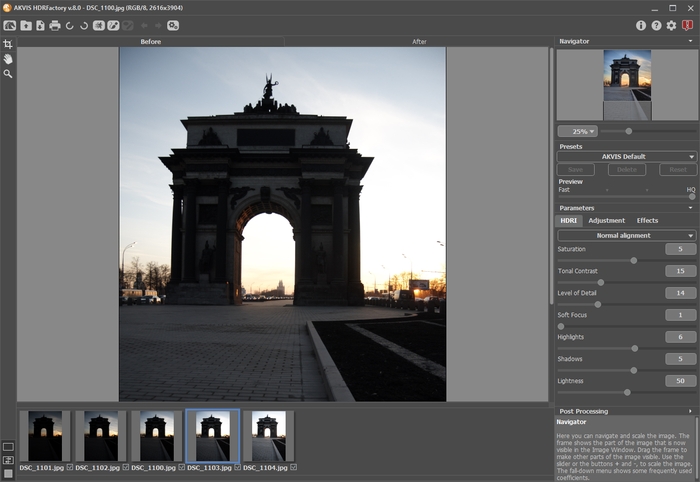
- Step 1. Run the standalone edition of AKVIS HDRFactory or your photo editor (if you work with the plugin version of AKVIS HDRFactory), and open a set of images.
To load a set of images in the plugin or in the standalone program click on
 and select all images holding down the Ctrl-key.
Under the image window you can see thumbnails of the opened files. The image which is selected with a blue frame is shown in the Before tab.

Set of ImagesHint: Learn how to get a series of shots with different exposure settings using a digital camera.
Attention! If the shots do not contain any exposure information you will see the Set Exposure Value dialog box (the hot-keys for the command Ctrl+Е) where you can enter the values manually.
At first the program calculates exposure for every shot automatically; then you can change the values either by selecting the exposure step in the drop-down menu or by entering arbitrary values.
The Reset button restores the automatically calculated exposure values.
The Apply button opens the images taking into account the set exposures.
The Cancel button closes the dialog box.
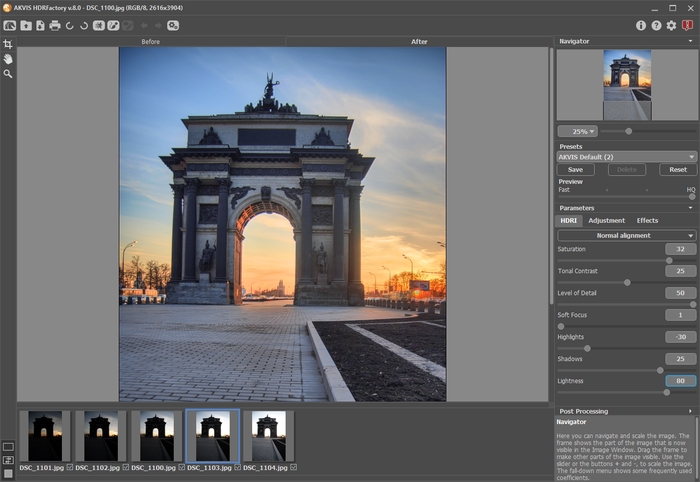
- Step 2. The photos will be automatically processed to build an HDR image with the last used parameter values (the first time - with the default values). The result will be shown in the After tab.
- Step 3. Select the value of the Preview parameter. It’s an auxiliary tool, it does not influence the real size of the image.
- Step 4. Adjust the alignment quality of the images by selecting one of the following options: Fast alignment, Normal alignment and High-quality alignment. The better the alignment quality, the longer the processing time will be. We recommend Normal alignment. If you are sure that there is no shift in the image series choose No alignment.
-
Step 5. Select one of the AKVIS presets or adjust the parameters as you like:
- Saturation (-50..50). The parameter changes the color intensity of the image.

Saturation = -50
Saturation = 50 - Tonal Contrast (0-50). The parameter changes brightness in gradient areas.

Tonal Contrast = 5
Tonal Contrast = 50 - Level of Detail (0-50). The parameter defines the amount of details. High values may cause noise.

Level of Detail = 10
Level of Detail = 40 - Soft Focus (1-15). The parameter aligns the image's color and brightness. It reduces the effect of other parameters.

Soft Focus = 1
Soft Focus = 10 - Highlights (-50..50). The parameter adjusts the lightness of the light areas of the image. Reduce the value to make the light areas darker, increase to make them lighter.

Highlights = -30
Highlights = 30 - Shadows (-50..50). The parameter adjusts the lightness of the dark areas of the image. Reduce the value to make the shadows darker, increase to make them lighter.

Shadows = -30
Shadows = 30 - Lightness (0-100). The parameter changes the overall lightness of the image and helps to illuminate it.

Lightness = 25
Lightness = 75
Image processing starts automatically and any changes are displayed in real time, in the After tab.

ResultNote: It's possible to apply additional effects to your High Dynamic Range image using the Adjustment and Effects tabs.
With the Home Deluxe/Business license, you can also use the Ghost Removal
 and Local Correction
  modes.
- Saturation (-50..50). The parameter changes the color intensity of the image.
- Step 6. If you like the new settings you can save them as a preset and use them later. To save the settings, enter a name for the preset in the Presets field and press the button Save.
