Sky Swapping
Now the technique of using AKVIS Chameleon is different, but the result will be the same.
Consult the article "Blend mode" to get the same result with the new version. In the older versions (before v.5.0) this mode was called Snapshot and applied automatically right after you launch the plugin from the menu Filter.
The Tutorial was created by Sergey Serikov in Adobe Photoshop.
It often happens that photos come out with a dull or washed out sky. Simple image correction will not help, as brightness or contrast increase make the sky yet lighter. You can apply our tricks to replace a dull sky with a more inspiring one.
Below the author shares the secret of the sky swapping. Having replaced the sky, he applies AKVIS Chameleon to add a new object to the sky.
Sergey chose the following photo for his tutorial.

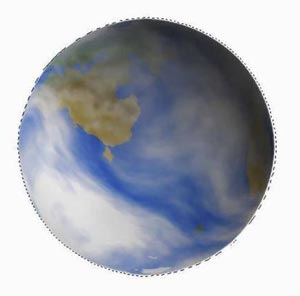
Paste an interesting sky in place of a boring one using the tools of Adobe Photoshop. For this purpose we need a beautiful sky with clouds.
- Step 1. Open the image that needs sky swapping in your photo editor.
- Step 2. Select the white sky by clicking with the Magic wand tool on the whitest point of the image
 . If the selection includes not only the sky but the child's cap or the tree branches as well, you should reduce the Tolerance parameter in the Options palette of the Magic wand tool and click the whitest point of the sky again.


- Step 3. Invert the selection as we do not need the white sky but the tree, the boy and the ladder. You can either press the key combination Shift+Ctrl+I or select the command Inverse in the Selection menu.
- Step 4. Copy the selection by pressing the key combination Ctrl+C.
- Step 5. Create a new layer and paste the copied selection (Ctrl+V).
- Step 6. Make the background layer invisible by removing the eye symbol on the left of the layer in the Layers palette.

- Step 7. Open the photo of a lovely sky, copy the sky and paste it into the picture.
- Step 8. Drag the layer with the blue sky in such a way that it were over the background picture and under the "without sky" selection.

- Step 9. Activate the layer with the blue sky and select the command Adjustments - Replace Color from the menu Image.
- Step 10. Use the eyedropper tool to select the blue color and adjust the parameters of color replacement in such a way that the color of the sky looked natural. Press the button Ok.

- Step 11. Prepare the object that you want to paste into the sky. For this purpose open the picture with this object, select and copy it (Ctrl+C).
- Step 12. Activate the layer with the sky and select the command AKVIS - Chameleon (Take Snapshot) in the menu Filter
- Step 13. Paste the copied object (in our case it is the planet Earth) into a new layer íover the layer with the blue sky.

Apply the tool Free Transform of Adobe Photoshop to adjust the size and position of the inserted object.
- Step 14. Apply the plug-in AKVIS - Chameleon (Use Snapshot) on the layer with the planet.
- Step 15. Admire the result.

Chameleon v. 12.2 - Free 10-day Trial
