Workspace
AKVIS Draw can work independently as a standalone program as well as a plugin to a photo editor.
Standalone is an independent program. You can run it in the usual way.
Plugin is an add-on for graphics editors, for example for Photoshop, AliveColors, and other compatible programs. To call the plugin, select it from filters of your image editing program.
The workspace is arranged according to the chosen interface mode: Parameters or Presets.
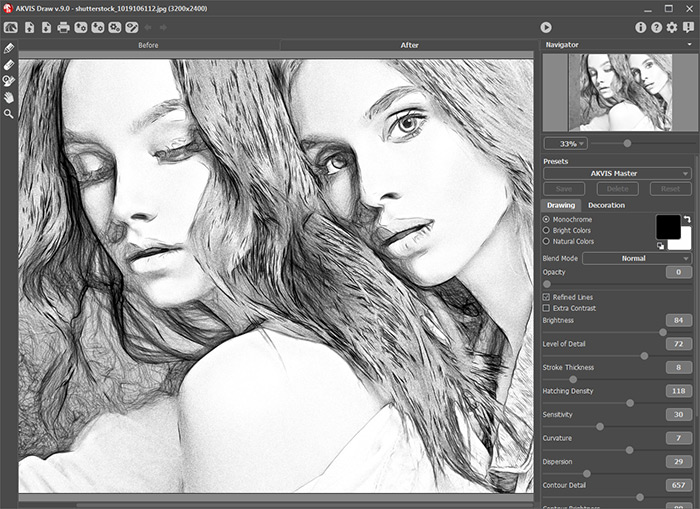
In the Parameters mode, the standard program window is visible. In this mode, you can adjust the effect settings in the right panel as well as choose presets from the drop-down list.

AKVIS Draw Workspace (Parameters Mode)
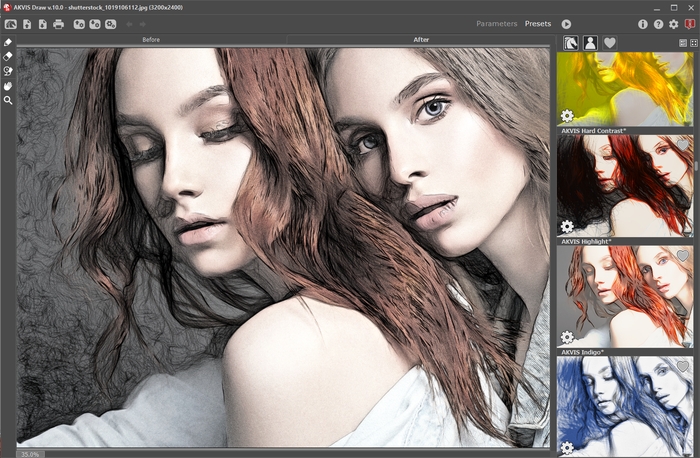
Click Presets in the top panel to switch to the presets visual display mode. The presets can be shown in the right panel or on the entire window (Presets Gallery).

AKVIS Draw Workspace (Presets Mode)
The left part of the AKVIS Draw window is taken by the image window with two tabs: Before and After. In the Before tab you can see the original photo. The After tab shows the resulting image. You can switch between the windows by left-clicking on the tab with mouse button. To compare the original image and the result, click on the image and hold the button pressed - the program will currently switch between tabs.
In the upper part of the program's window you can see the Control Panel.
- The button
 opens the home page of AKVIS Draw.
- The button
 (only in the standalone version) opens an image for processing. The hot-keys are Ctrl+O on Windows, ⌘+O on Mac.
Right mouse click on this button displays the list of recent files. You can change the number of recent documents in the program's preferences.
- The button
 (only in the standalone version) saves image to the disk. The hot-keys are Ctrl+S on Windows, ⌘+S on Mac.
- The button
 (only in the standalone version) prints the image. The hot-keys are Ctrl+P on Windows, ⌘+P on Mac.
- The button
 imports a list of user presets (from the .draw file).
- The button
 exports user presets. You can save any presets to a .draw file.
- The button
 (only in the standalone version) opens the Batch Processing dialog that lets you automatically convert a series of images.
- The button
 /
/  shows/hides the effect area outlines drawn with the tools.
- The button
 cancels the last operation with the post-processing tools (in the After tab).
It is possible to cancel several operations in a row. The hotkeys are Ctrl+Z on Windows, ⌘+Z on Mac. - The button
 returns the last cancelled operation. It is possible to return several operations in a row. The hotkeys are Ctrl+Y on Windows, ⌘+Y on Mac.
- The button
 is used to start image processing if the Autoran Mode is disabled.
- The button
 (only in the plugin version) applies the result to the image and closes the plugin.
- The button
 shows information about the program, version and license.
- The button
 calls the Help files. The hot-key is F1.
- The button
 calls the Preferences dialog box.
- The button
 opens a window showing the latest news about Draw.
To the left of the main window there is the Toolbar. Different tools appear in the Before/After tabs.
Pre-Processing Tools (in the Before tab):
- The button
 (in the standalone program) activates the Crop tool. The tool lets you cut off unwanted areas in the image. The tool's options are visible in the Settings Panel.
- Effect Area
 . Use the blue pencil to draw an outline within the areas that will be converted to a drawing.
- No Effect Area
 . Use the red pencil to outline the parts of the image that will remain in their original state.
- Eraser
 . Use this tool to edit the outlines drawn by the pencils.
Post-Processing Tools (in the After tab):
- The button
 activates the Pencil which lets you draw over the result.
- The button
 calls the Eraser tool that erases the pencil strokes.
- The button
 activates the History Brush tool which lets you fade the effect and restore the image to its original state (works under Home Deluxe/Business licenses only).
The options of the Pencil, Eraser, and History Brush are shown in a pop-up box which appears when right-clicking on the image.
Additional Tools:
- The button
 activates the Hand tool (the hot-key is H) which lets you scroll the image when it does not fit within the window at the desired scale. Bring the cursor over the image, and while keeping the left mouse button pressed move in the desired direction.
Double-clicking on the tool's icon makes the image fit the window.
- The button
 activates the Zoom tool (the hot-key is Z) which changes the image's scale. To zoom in click on the image. To zoom out click with Alt.
Double-clicking on the tool's icon makes the image scale to 100% (actual size).
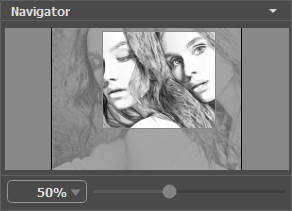
Navigate and scale the image using the Navigator. The frame in the Navigator surrounds the area of the image which is visible in the image window; the area outside of the frame will be shaded. The frame can be dragged, thereby changing the visible portion of the image. To move the frame, place the cursor within it, left click the mouse, and then drag.

Navigator
Use the slider to scale the image in the Image Window. When you move the slider to the right, the image scale increases. When you move the slider to the left, the image scale decreases.
To scroll the image in the main window you can press the spacebar on the keyboard and drag the image with the left mouse button. Use the scroll wheel of the mouse to move the image up/down, by keeping the Ctrl key pressed – to the left/to the right, by keeping the Alt key pressed − scale the image. Right-click on the scroll bar to activate the quick navigation menu.
You can also change the image scale by entering a new coefficient into the scale field. The fall-down menu shows some frequently used coefficients.
You can use hot-keys to change the image scale + and Ctrl++ (⌘++ in Mac) to increase the image scale and - and Ctrl+- (⌘+- in Mac) to reduce the scale.
Under the Navigator there is the Settings Panel with two tabs:
- Drawing: Here you can adjust the parameters for photo to sketch conversion.
- Decoration: You can add text to your image, adjust the canvas, and apply a frame.
Below, in the Presets field you can save the current settings as a preset to use them in the future. The current settings can be saved, edited, deleted. When you launch the program, it uses the settings of the last used preset.
The Hints field will help you to understand how to use the program. The description for the parameters and buttons appear when you hover over them with the cursor. You can choose where the hints will be shown or hide them in the program's preferences.
