Using The Neon Video Plugin in EDIUS Pro 9
AKVIS Neon Video applies glowing lines effects to your videos. The plugin is compatible with Grass Valley EDIUS Pro 9.
Learn how to install the plugin in EDIUS Pro 9:
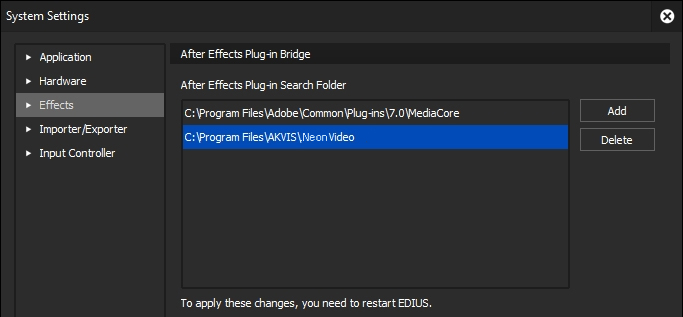
- Select Settings -> System Settings...
Choose Effects -> After Effects Plug-in Bridge.
Click Add and select the Neon Video folder: C:\Program Files\AKVIS\Neon Video.
Click OK and restart the video editor.

How to use the plugin in EDIUS Pro 9:
- Step 1. Open a project in your video editing program. For low contrast videos, you can use Curves.
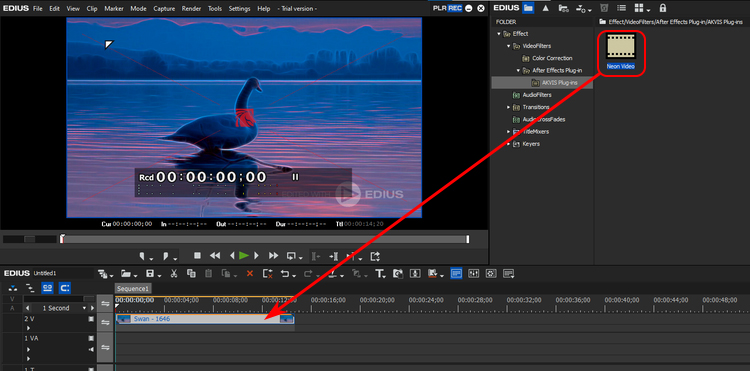
- Step 2. Call the AKVIS Neon Video plugin.
Select Effect -> VideoFilters -> After Effects Plug-in -> AKVIS Plug-ins -> Neon Video and drag it into the Timeline.

The glowing effect will be shown in the current frame.
- Step 3. You can apply ready-to-use presets or create your own effect. The AKVIS built-in presets are available in the drop-down list above the effect parameters.
To adjust the neon effect settings, choose Preset -> Custom and change the parameters.
To reset the parameters to their default values, use the the
 icon.
icon.
- Step 4. You can save your favorite settings as a preset.
Right-click the effect and select Save as Current User Preset. The new user preset will appear in the Effect -> VideoFilters -> After Effects Plug-in -> AKVIS Plug-ins folder.
- Step 5. Save the video. Select File -> Export -> Print to File, adjust the format settings, and click Export.
Neon Glowing Effect
