Monitor Calibration: Black Point
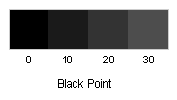
You should be able to distinguish between the patches marked 0 and 10 in the above grayscale. Patch 0 should be perfectly black, matching the unscanned portion of your monitor, and patch 10 should be barely visible. In this section you will adjust monitor brightness so the black point is properly calibrated.
Adobe Gamma, and several web sites, attempt to adjust the black point with grayscale patches. However, the quality of monitor displays varies significantly, and attempting to read something out of low-valued patches is fraught with difficulties.
When the black point is properly set, an RGB value of (0,0,0) will appear as true black on your monitor. Increase the RGB value slightly and you should see a slight increase in intensity. The non-scanned area surrounding the displayed image is an ideal reference for the black point. The goal is to make the display value (0,0,0) match the black of the non-scanned border.
For adjustments to be accurate you need to use consistent lighting when viewing your monitor. The black point for a brightly-lit room will be higher than a dimly-lit room. After setting room lights to your standard, minimize any on-screen applications (including your browser). If there are bright-colored icons on your desktop, move them to a folder and minimize the folder. You can easily retrieve them later. It is very important that your screen be completely black.
Set the desktop background color to black (0,0,0). To set the background color in Windows, choose Start > Settings > Control Panel, double-click on Display, and click on the Desktop tab. You can verify the RGB value is (0,0,0) by double-clicking on the color patch to view the Color Picker dialog box.
Set brightness and contrast to 100%. Adjust the vertical dimensions of the screen so you can easily distinguish the border between the scanned and non-scanned areas. To make this adjustment, shrink the view vertically, or move the view up and down with your monitor controls. This will expose the non-scanned area. If you shrank the window 2" from the top, then the border between the scanned and non-scanned area should be 2" down on your screen.
Decrease brightness until the the scanned area blends with the non-scanned area. If there is a dialog box for monitor brightness, and it is distracting, mask it so it doesn't interfere with this step. Go back and forth until you've identified the point where the scanned area starts increasing in intensity. Lock the setting when the scanned area just starts to become visible.