Layers Palette
The Layers palette lets you work with layers (sets of pixels which can be edited separately) and groups of layers.
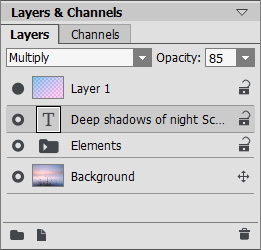
"Layers" Palette
The palette contains a list of layers. Until an image is opened in the program or a new document has been created, this list will be empty.
The active (editable) layer will be highlighted in gray in the list. To choose another layer, click on its name or thumbnail. To choose multiple layers, click on them while holding Ctrl. To choose all layers between the active and chosen layers, while the active layer is highlighted, click on the chosen layer while holding down Shift.
To rename a layer, double left-click on the layer's name next to it's thumbnail, then enter a new name and press Enter.
To the left of a layer’s thumbnail is a visibility indicator ![]() /
/![]() , which can be used to temporarily hide or show the contents of a layer. Editing tools cannot be used on a layer when its visibility is switched off. To switch a layer's visibility left-click on the indicator.
, which can be used to temporarily hide or show the contents of a layer. Editing tools cannot be used on a layer when its visibility is switched off. To switch a layer's visibility left-click on the indicator.
Note 1: The layers in a group are visible only if that group's visibility is activated (regardless of the visibility of individual layers).
Note 2: When a file is saved to a format which does not support layers, invisible layers are discarded.
Layers are either Raster or Artistic. Each type of layers has its own set of tools (Std or Art in the toolbar). An artistic layer will be labelled Art on its right side (see the screenshot above). Also, there is a Text layer which is used for adding text. To use the standard tools on an artistic/text layer you need to rasterize it first.
The order of the layers can be changed by dragging them up or down while pressing the right-mouse button.
Right-clicking on a layer opens a menu of commands. The menu’s contents may vary depending on the type of layer and the number of selected layer.
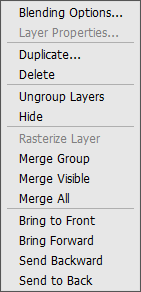
Blending Options opens the blending options menu.
Layer Properties opens a separate menu of parameters for an artistic layer.
Duplicate copies the selected layer or group.
Delete deletes the selected layer or group (analogous to ![]() ).
).
Rasterize Layer converts any layer to a regular (raster) layer.
Group Layers combines selected layers into a group (analogous to ![]() ).
).
Ungroup Layers quickly separates layers from the selected group.
Show/Hide enables/disables the display of the contents of layers/groups.
Merge Group merges all visible layers in a group to one layer. The new layer will appear in the list in place of the group.
Merge Visible combines all visible layers into one layer.
Merge All combines all visible layers, discarding the invisible ones, into one layer.
Bring to Front moves the selected layer to the top of the list.
Bring Forward swaps places between the selected layer and the layer above it.
Send Backward swaps places between the selected layer and the layer below it.
Send to Back moves the selected layer to the bottom of the list.
To the right of a layer’s name there is a lock icon. Click on it to open a menu with the buttons which represent various levels of protection of the layer from changes.
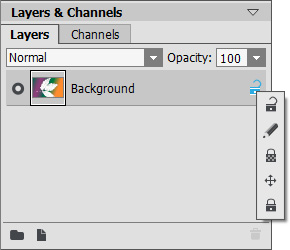
Lock Menu
Unlock ![]() - this icon means the layer is in an unlocked state (available for changing).
- this icon means the layer is in an unlocked state (available for changing).
Lock Image Pixels ![]() protects the opaque pixels on a layer from any changes made by drawing/editing tools.
protects the opaque pixels on a layer from any changes made by drawing/editing tools.
Lock Transparent Pixels ![]() (only for raster layers) prevents changes to the transparent pixels on a layer.
(only for raster layers) prevents changes to the transparent pixels on a layer.
Lock Position ![]() prevents a layer from being moved.
prevents a layer from being moved.
Lock All ![]() prevents any changes to a layer.
prevents any changes to a layer.
Double-clicking on a layer’s thumbnail opens the Blending Options menu. Close the menu by pressing Esc (changes will be ignored) or by clicking outside of the menu window (changes will be saved).
The Blending Options menu looks like this:
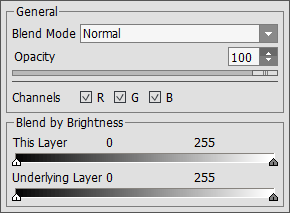
- Blend Mode provides ways to blend the pixels on one layer with those on the layer below it (read more).
-
Opacity (0-100) affects the visibility of other layers below the selected layer. If a layer has an opacity of 0%, it will be completely transparent (invisible). An intermediate value of opacity results in partial permeability of the pixels on that layer. At 100% opacity only the pixels on that layer are visible. Transparent and translucent areas are filled with a checkerboard pattern.
For blend modes other than normal, Opacity affects to what extent they are involved in forming a blended image.
- Channels mode controls independent color channels. Clicking on a check box determines which color channels will be involved when blending layers.
- Blend by Brightness controls the visibility of pixels on the active layer and layers below it based on their brightness (read more).
If you click on the word Art on an artistic layer in the list, the Layer Properties menu will open:
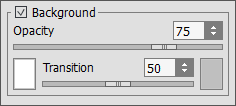
Activating the Background check box fills the layer with a color.
Opacity (1-100) controls how much the background color will be mixed with the colors of pixels in underlying layers.
Transition (0-100) controls the ratio of colors in a background fill. The higher the value for this parameter, the more dominant the first color will be. To change the color, click on the color plate and choose a color from the Select Color dialog window.
The buttons at the bottom of the palette are used as follows:
- The New Group button
 allows you to combine multiple layers into one set. When you click on this button in the Layers palette, elements will be created named Group 1, Group 2, etc., each with a folder icon
  . By moving a folder you can move all of the layers within it together.
To add a layer to a group, drag it to the folder while holding down the left mouse button and release it when it is above the folder. You can remove a layer from a group in a similar way. If you drag the folder to the
 button at the bottom of the palette, a copy of the folder along with its sub-layers will be created.
To group multiple layers at once, select them and press the
 button. The layers will automatically be combined into a new group.
To rename a group, just double click on its name, enter a new name and press Enter.
If a group is not empty (contains layers), a triangle
 will appear on it. Double clicking on the triangle allows you to open or close the group. When a group is open
  , its constituent layers can be moved, deleted, or edited individually.
You can change a Blend Mode for a group of layers. By default, the Pass Through mode is selected for a group in the blend modes list, that is the layers inside the group interact with each other (and the layers below) in the usual way - as if they are not grouped. When other blend modes are used, the group behaves as if all layers inside it are combined into one layer, which interacts with the layers outside the group based on the chosen blend mode. In this case, blend modes of individual layers in the group are valid only within that group, and have no affect on layers outside of the group.
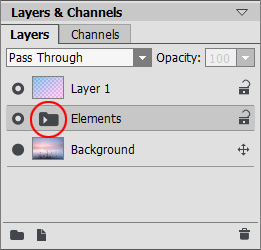
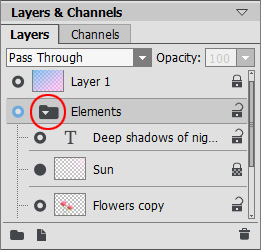
Closed Group Open Group - The New Layer button
 creates a new layer above the active layer or in the active group. When you create a new layer a pop-up menu will appear, where you can choose the layer type, either Raster or Artistic. If you drag a layer (or group) to this button while holding the left mouse button and then release the left mouse button, a copy of that layer (or group) will be created.
- The Delete button
 deletes the selected layer or group. When a group is dragged to this button the group along with all of its contents will be deleted. If a group is selected, and then the button is pressed, it's possible to delete the group with or without its content (your choice).
Note: It is impossible to delete all layers.