For the Mother's Day: Family Archives Restoration
Would you like to make an original present to your mother or grandmother for Mother's Day?
Restore their old photos from the family archives!
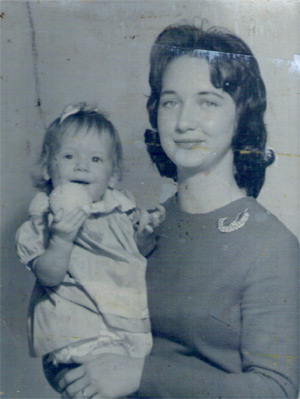
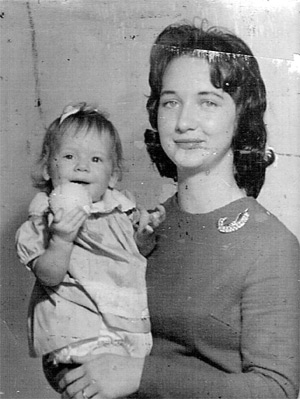
Below is an old photo sent to us by Chuck Croom. He is now engaged in the restoration of his family archives and we believe AKVIS Retoucher AI will be of help to him.
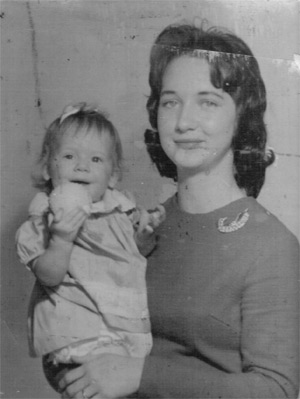
Compare the three photos below: the original photo covered with stains and scratches, the retouched photo and the retouched photo converted in sepia tones.


We will retouch the photo using AliveColors and the AKVIS Retoucher AI plugin.
- Step 1. Open the family photo in AliveColors.
- Step 2. Call the command Image → Adjustment → Black & White to get rid of the bluish hue and the stains.
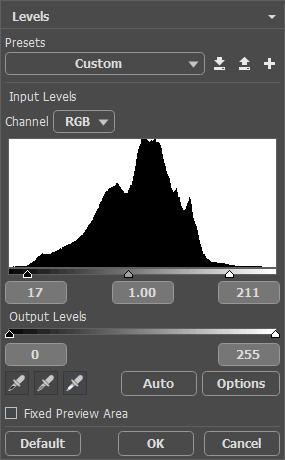
- Step 3. Open the Levels dialogue box by calling the command Image → Adjustment → Levels and set the following input values 17, 1.00 and 211 as shown on the picture below.
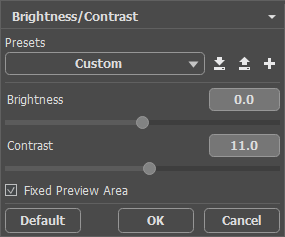
- Step 4. To increase the contrast of the image move the slider Contrast to the right to +11 in the Brightness/Contrast dialogue box.
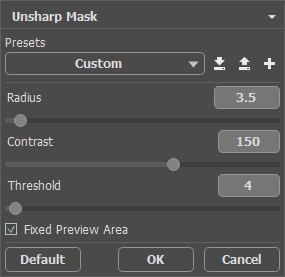
- Step 5. Increase the sharpness of the image using the Unsharp Mask filter. For this purpose select the command Sharpen → Unsharp Mask from the menu Effects and set the following values for the parameters: Contrast = 150, Radius = 3.5, Threshold = 4.
After these manipulations we get the following image:
- Step 6. Now we can proceed to the defects removal: we will remove scratches using AKVIS Retoucher AI. Call the AKVIS Retoucher AI plug-in, by choosing AKVIS → Retoucher from the Effects menu an select the scratches as it is shown on the picture below.
- Step 7. Begin the retouching process by pressing
 .
.
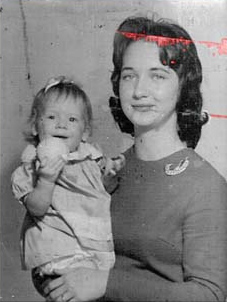
After the scratches are removed, the photo will look like this:

- Step 8. Now a number of small defects on the image need to be removed. Use the Zoom
 tool to scale image to make even the smallest defects visible. Select the Chameleon Brush
  .
.
At each place on the image where you want to remove a defect, follow these steps:
- Adjust the size of the brush.
- Designate a sample source. To do this, while pressing Alt (Mac: Option), left click with mouse on the point from which the clone sample will be taken.

- Use short strokes to mark over the defects in the image.

After retouching is completed, press
 to apply the results.
At this stage, the image will look like this:

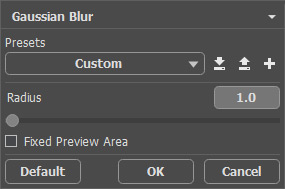
- Step 9. We can improve the photo by applying the filter Gaussian Blur (Effects → Blur → Gaussian Blur) with the value of the Radius parameter equal to 1.
We have retouched the family photo.
Note: To convert the photo into sepia tones you should activate the Actions palette, select the command Vintage Effect from the list and press the Play button ![]() in the lower part of the palette.
in the lower part of the palette.
You can also add colors to the photo using AKVIS Coloriage. Follow the link to see how this photo would look in color.
Retoucher AI v. 13.0 - Free 10-day Trial
