A sunny smile
It happens that the memory of a person dear to your heart is left only as a couple of photos. If these are the old photos of your grandparents or older friends they may be quite damaged and frayed.
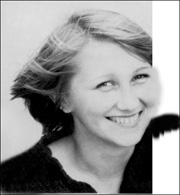
In the following case we also have an old black and white photo of a small size (6 x 4 sm.) with jagged borders and numerous creases. The photo is faded out and a part of the face is missing.
 |
 |
We would like to restore this photo of a girl with a wonderful sunny smile.
Note: This tutorial was created in the old version of Retoucher. Learn here how to use the new version with all its features! Though it processes images in a similar way, new Retoucher offers selection and retouch tools and advanced features.
- Step 1. Open the photo in Adobe Photoshop photo editor.

- Step 2. Switch to Quick Mask mode pressing the button
 in the Toolbar or the hot key Q.
- Step 3. Select the Pencil tool with a hard edge pressing the button
 in the Toolbar or the hot key B.
- Step 4. Paint over the creases, scratches, stains and other defects with Pencil in Quick Mask mode

- Step 5. Switch back to the Standard Mode pressing the button
 in the Toolbox or the hot key Q.
- Step 6. Invert the selection calling the command Select-Inverse in the menu or pressing the key combination Ctrl+Shift+I.

- Step 7. Select the command Filter-AKVIS - Retoucher from the menu.
- Step 8. Press the button
 in the program window of AKVIS - Retoucher to initiate the restoration process.

- Step 9. When AKVIS Retoucher is through with its job press the button
 to apply the restoration result.
- Step 10. To remove the selection call the command Select-Deselect from the menu or use the key combination Ctrl+D .

- Step 11. Let's retouch the shoulder and the background with the following tools
 Healing Brush Tool and
  Clone Stamp.

- Step 12. To convert the image to grayscale select the command Image - Mode - Grayscale.

- Step 13. Switch back to the RGB mode selecting the command Image - Mode - RGB.
- Step 14. Adjust the color rendering using the command Image- Adjustments - Curves.
- Step 15. To remove minor scratches, hair and other defects that appear due to scanning use the Noise filter. For this purpose select the command Filter - Noise - Dust & Scratches.

- Step 16. Correct the photo using the
 - Blur Tool and - Healing Brush Tool.
 Or you can achieve the same results with AKVIS MultiBrush (using Blur Tool and Chameleon Brush).
- Step 17. Restore the missing part of the face. First you should increase the canvas size calling the command Image - Canvas Size and increasing the canvas width by 1 sm on the right.

- Step 18. We will restore the missing part of the face and shoulder using the following tools:
- Blur Tool; - Healing Brush Tool; - Clone Stamp.
- Step 19. Let's change the shape of the restored shoulder selecting the unnecessary parts with
 Lasso Tool and removing the selection.

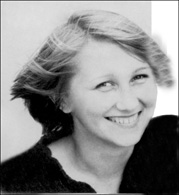
- Step 20. It is possible to restore the original sepia tone by selecting the command Sepia Toning (layer) from the Actions palette.
Start the process by pressing the button
 (Play selection) in the lower part of the Actions palette.

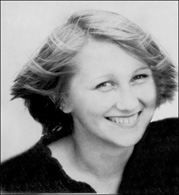
When you see this wonderful smile you can't help smiling back.
Retoucher v. 12.2 - Free 10-day Trial
