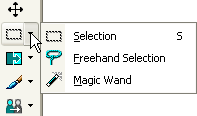
Paint Shop Pro 選択ツール
Paint Shop Pro には、選択ツール、自由選択ツール、自動選択ツールの 3 種類が用意されています。 ツールボックスのアイコンには、最後に選択したツールのみが表示され、残りのツールは同じアイコンのメニューの中に隠れています。隠れたメニューを開くには、アイコンの右側の矢印をクリックします。

- The Selection tool
- The Freehand Selection tool
- Magic Wand
The tool allows selecting polygonal areas, ellipses, circles, stars, arrows.
To make a selection using the Selection tool you should:
Step 1. Take the Selection tool from the Toolbox by clicking on the icon
![]() , or (if the Selection tool was not the last tool applied) select it from the floating window.
, or (if the Selection tool was not the last tool applied) select it from the floating window.
Step 2. Set the shape of the selected area using the Selection Type parameter of the Options palette.
Step 3. Set the value of the Mode parameter in the Options palette: Replace (selection replacement, if there already was a selection it'll disappear), Add (selection expansion, adds the new selection to the previous one) or Remove (subtracts the new selection from the previous one).
Step 4. Bring the cursor onto the image and press the left button.
Step 5. Keeping the left button pressed, move the cursor diagonally until you get the required shape, release the button. The selected area will be marked by a dotted line.
The tool allows making freehand selections and precise selection of object borders.
To make a selection using the Freehand Selection tool you should:
Step 1.
Take the Freehand Selection tool from the Toolbox by clicking on the icon
![]() , or (if the Freehand Selection tool was not the last tool applied) select it from the floating window.
, or (if the Freehand Selection tool was not the last tool applied) select it from the floating window.
Step 2. Set the value of the Mode parameter in the Options palette: Replace (selection replacement, if there already was a selection it'll disappear), Add (selection expansion, adds the new selection to the previous one) or Remove (subtracts the new selection from the previous one).
Step 3. Set the method of contour creation in the Options palette: Edge Seeker, Freehand, Point to Point or Smart Edge.
Step 1. Make a selection:
For methods Edge Seeker, Point to Point and Smart Edge you should bring the cursor to the required object, make a left-click, and continue clicking along the border of the selected object until the whole object is selected. Close the contour and double-click with the left button to finish the selection process.
For the Freehand method you should bring the cursor to the required object and keeping the left button pressed outline the object. Close the contour and release the button.
The Magic Wand tool allows selecting areas with similar color, brightness, opacity.
To make a selection using the Magic Wand tool you should:
Step 1.
Take the Magic Wand tool from the Toolbox by clicking on the icon
![]() ,
or (if the Magic Wand tool was not the last tool applied) select it from the floating window.
,
or (if the Magic Wand tool was not the last tool applied) select it from the floating window.
Step 2. Set the value of the Mode parameter in the Options palette: Replace (selection replacement, if there already was a selection it'll disappear), Add (selection expansion, adds the new selection to the previous one) or Remove (subtracts the new selection from the previous one).
Step 3. Set the value of the Match mode parameter in the Options palette.
Step 4. Set the value of the Tolerance parameter in the Options palette.
Step 5. Left-click on the part of the image that should fall in the selection.