Restauro degli archivi di famiglia – regalo per la Festa della Mamma
Volete fare un regalo originale alla vostra mamma o alla nonna per la festa della mamma? Ripristinate le loro vecchie foto dagli archivi di famiglia!
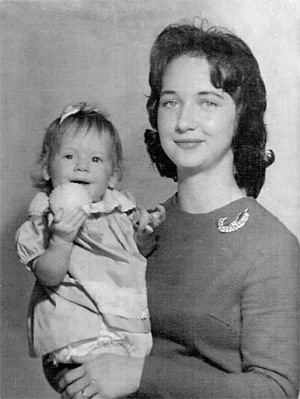
Qui di seguito c’è una vecchia foto inviataci da Chuck Croom. Egli è impegnato nel restauro del suo archivio famigliare e siamo sicuri che AKVIS Retoucher gli sarà di grande aiuto.
Ecco le tre foto a confronto: quella originale coperta di macchie e graffi, quella ritoccata e quella ritoccata convertita in tonalità seppia.


Ritoccare la foto utilizzando AliveColors e il plugin AKVIS Retoucher.
- Passaggio 1. Aprire la foto in AliveColors.

- Passaggio 2. Scegliere Immagine -> Regolazione -> Bianco e nero saturazione per rimuovere le macchie e la tonalità blu.

- Passaggio 3. Aprire la finestra Livelli dal menu Immagine -> Regolazione -> Livelli ed impostare i valori di Input 17 - 1,00 – 211.

- Passaggio 4. Selezionare Immagine -> Regolazione -> Luminosità/Contrasto e spostare il cursore Contrasto a +11.

- Passaggio 5. Per aumentare la nitidezza dell'immagine selezionare dal menu Effetti -> Nitidezza -> Maschera di contrasto ed impostare i seguenti parametri: Contrasto 150, Raggio 3,5 pixel, Soglia 4 livelli.

Dopo questi trattamenti si è ottenuta la seguente immagine:

- Passaggio 6. Ora siamo in grado di eliminare i difetti usando AKVIS Retoucher. Lanciare il plugin AKVIS Retoucher selezionando il comando Effetti -> AKVIS -> Retoucher ed usare lo strumento Pennello selezione
 per disegnare sui graffi, così come indicato sulla foto qui sotto.

- Passaggio 7. ed avviare il processo di ripristino premendo su
 .
.
Si otterrà la seguente immagine:

- Passaggio 8. Ora procedere al ritocco dei piccoli difetti.
Utilizzare lo strumento Zoom
 per modificare la scala dell'immagine in modo che si possano vedere anche le macchie più piccole. Attivare il Pennello camaleonte
  .
.
Rimuovere tutti i difetti ripetendo questi passaggi in ogni porzione dell’immagine:
- Regolare la dimensione dello strumento.
- Impostare il punto di origine cliccando sull’area da clonare con il tasto Alt (Mac: Opzione) premuto.

- Trattare i difetti con brevi pennellate.

Quando tutti i difetti saranno rimossi, applicare il restauro premendo su
 .
.
Si otterrà la seguente immagine:
- Passaggio 9. Per migliorare ulteriormente la foto, in AliveColors applicare il filtro Sfocatura gaussiana (Effetti -> Sfocatura -> Sfocatura gaussiana) con il parametro Raggio pari a 1.

Abbiamo ritoccato nel modo migliore la foto di famiglia.
Nota: Per convertire l’immagine in tonalità seppia è necessario attivare la paletta Azioni, selezionare dalla lista Azioni Predefinite il comando Vintage Effect e premere il pulsante Esegui ![]() nella parte inferiore della palette.
nella parte inferiore della palette.
È inoltre possibile colorare la fotografia utilizzando AKVIS Coloriage. Seguire il link per vedere com’è questa immagine a colori e come fare a realizzarla.
Retoucher v. 12.2 - 10-giorni di prova gratuita
