Workspace
AKVIS Points turns your photos into pointillism painting artworks. The software can be used independently as a standalone program or in a photo editor as a plugin filter.
Standalone is an independent program. You can run it in the usual way.
Plugin is an add-on for graphics editors, for example for Photoshop, AliveColors, and other compatible programs. To call the plugin, select it from filters of your image editing program.
The workspace will be arranged according to the editing mode chosen in the Control Panel: Express, Advanced or Presets.
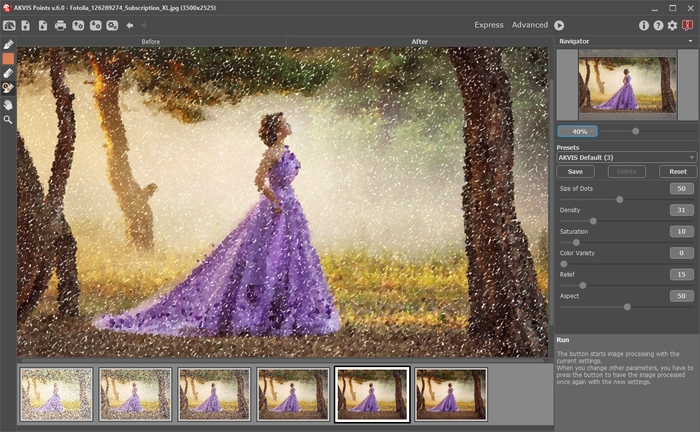
In Express mode, the program’s interface is extremely simplified. It has the minimal set of parameters needed for a user to quickly obtain a satisfactory result.

Workspace of AKVIS Points (Express)
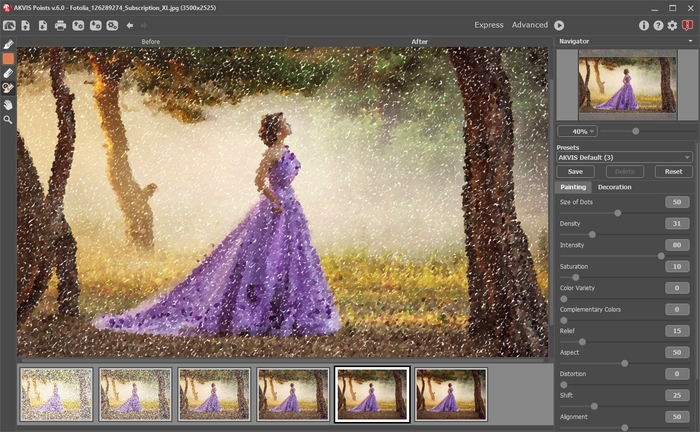
In Advanced mode, the full functionality of the program is available.
Note: All features and parameters work in Express mode. Some are hidden and use default values or those of a chosen preset.

Workspace of AKVIS Points (Advanced)
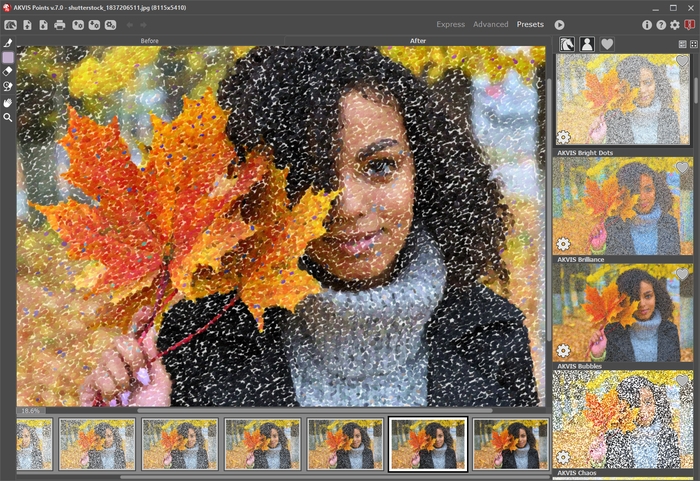
Click Presets in the top panel to switch to the presets visual display mode. The presets can be shown in the right panel or on the entire window (Presets Gallery).

AKVIS Points Workspace (Presets Mode)
The left part of the AKVIS Points window is taken by the Image Window with two tabs: Before and After. The Before tab shows the original photo, the After tab - the result. You can switch between them by left-clicking on the tab with mouse button. To compare the original and the resulting images, click on the image and hold the button pressed - the program will currently switch between tabs.
In the upper part of the program’s window you can see the Control Panel:
- The button
 opens the home page of AKVIS Points.
- The button
 (only in the standalone version) opens an image for processing. The hot-keys are Ctrl+O on Windows, ⌘+O on Mac.
Right mouse click on this button displays the list of recent images. You can change their number in the program’s Preferences.
- The button
 (only in the standalone version) saves image to the disk. The hot-keys are Ctrl+S on Windows, ⌘+S on Mac.
- The button
 (only in the standalone version) calls the Print dialog box. The hot-keys are Ctrl+P on Windows, ⌘+P on Mac.
- The button
 exports presets (user settings for the image processing). You can save any number of presets to a separate file with the ending .points extension.
- The button
 imports a list of presets (from the .points file).
- The button
 (only in the standalone version) opens the Batch Processing dialog to automatically process a series of images.
- The button
 cancels the last operation (with the tools). It is possible to cancel several operations in a row. The hotkeys are Ctrl+Z on Windows, ⌘+Z on Mac.
- The button
 returns the last cancelled operation. It is possible to return several operations in a row. The hotkeys are Ctrl+Y on Windows, (⌘+Y on Mac.
- The button
 initiates image processing with the current settings. The resulting image is shown in the After tab.
- The button
 (only in the plugin version) applies the result to the image and closes the plugin.
- The button
 shows information about the program: version, trial period, license.
- The button
 calls the Help files. The hot-key is F1.
- The button
 calls the Preferences dialog box for changing the program’s options.
- The button
 opens a window showing the latest news about Points.
To the left of the main window there is the Toolbar. Different tools appear depending on the active tab, Before or After. The tools are divided into the groups: pre-processing (in the Before tab), post-processing (in the After tab), and additional tools (available in both tabs).
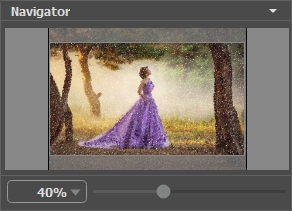
You can navigate and scale the image using the Navigator. The frame in the Navigator surrounds the area of the image which is visible in the Image Window; the area outside of the frame will be shaded. The frame can be dragged, thereby changing the visible portion of the image. To move the frame, place the cursor within it, left click the mouse, and then drag.

Navigator
To scroll the image in the Image Window you can press the spacebar on the keyboard and drag the image with the left mouse button. Use the scroll wheel of the mouse to move the image up/down, by keeping the Ctrl key pressed – to the left/to the right, by keeping the Alt key pressed − scale the image. Right-click on the scroll bar to activate the quick navigation menu.
Use the slider to scale the image. When you move the slider to the right, the image scale increases. When you move the slider to the left, the image scale reduces.
You can also change the image scale by entering a new coefficient into the scale field. The fall-down menu shows some frequently used coefficients.
You can use hot-keys to change the image scale + and Ctrl++ (⌘++ in Mac) to increase the image scale and - and Ctrl+- (⌘+- in Mac) to reduce the scale.
Under the Navigator there is the Settings Panel with the Painting and Decoration tabs:
- Painting: Here you can adjust the parameters of the pointillism effect.
- Decoration: You can add text to your image, adjust the canvas, and apply a frame.
Below, in the Presets field you can save the current settings as a preset to use them in the future. The current settings can be saved, edited, deleted. When you launch the program, it uses the settings of the last used preset.
Under the Settings Panel you can see Hints for the parameters and buttons when you hover over them with the cursor. You can choose where the hints will be shown or hide them in the Preferences dialog box.
