A Portrait of a Young Lady
The example was made in the old version of AKVIS Stamp.
Starting from version 4.0 the program is called AKVIS MultiBrush.
The tool used in this tutorial is now called the Chameleon Brush tool.
The author of the tutorial is David Kelly.
After successfully using the AKVIS Coloriage v. 2.0 colourizing tool I decided to try out another of their Paint Shop Pro, Photoshop compatible plug-ins, the AKVIS Stamp v3.0 cloning tool. If Stamp produced the results that AKVIS claim, it certainly would add to the functionality and power of any compatible image-editing program. Apparently it's not dissimilar to Adobe's "Healing Brush," but not being a Photoshop user I can't comment on any similarity between the two.
Described by AKVIS as an "Image Healing Tool," the most obvious way to test out its capabilities, and to verify AKVIS' claims (or otherwise) for Stamp was to use it in conjunction with Paint Shop Pro 9 to edit an existing photograph.
AKVIS STAMP EXISTING EXAMPLES
The AKVIS website contains numerous examples of photos showing what can be achieved with this cloning tool. Of these, two are colour photos of a young girl. In one she is seen wearing eyeglasses, in the other they've been removed with AKVIS Stamp. For this evaluation I've taken the same approach and used a similar style of photo. It's an early 1900s sepia-toned photograph of a young lady, also wearing eyeglasses.
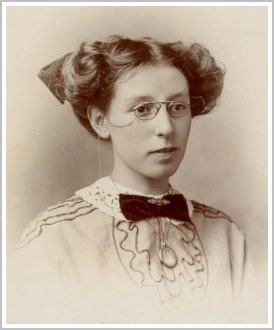
|
| Image 01 Photo © Roger Vaughan |
AKVIS STAMP TUTORIAL
Because the AKVIS website already contains a comprehensive tutorial explaining how the eyeglasses were removed from the young girl's web photo, and given that the cloning procedure would be similar to that used by myself, it isn't necessary to repeat the same instructions a second time. The easy-to-follow tutorial can be viewed by clicking here.
THE BEFORE AND AFTER PHOTOGRAPHS
Image 01: The original sepia-toned photograph before editing.
Image 02: The photograph after editing with Paint Shop Pro 9.
Image 03: The AKVIS Stamp v3.0 edited version with the eyeglasses removed.

|

|
| Image 02 | Image 03 |
ADDITIONAL EDITING WITH STAMP
Stamp was also used to clean up the small dark patch directly under the young lady's lower lip, plus remove the dark shadow under her right eye. These can be seen in Images 01 and 02. In this example the AKVIS Stamp plug-in's ability to merge differing brightness levels has resulted in the cloned patches blending seamlessly with the target area to reduce these two dark patches to the almost shadow less areas seen in Image 03.
Although obvious in many photographs, depending on the light source and direction, these types of dark patches can be naturally occurring shadows that contribute to the photo's modeling, and if removed completely can alter the subject's appearance. In others, they can show up as unsightly dark areas, and as they don't respond well to the standard image correction tools they can be difficult to deal with. They are most likely to be seen in older, faded photographs, particularly in those parts of the face prone to shadows, i.e. under the eyes, the nose, and in the neck and chin areas. Anyone with an interest in digital photo restoration will appreciate Stamp's ability to quickly and easily fix this type of problem.
THE AKVIS CLAIM
"Unlike common cloning tools that have a bit of a problem when it comes to pasting the cloned object into a picture with complicated colour transitions, AKVIS Stamp boasts automatic adjusting of the "patches" to the colour range, texture and brightness of the target background." Is this statement true? Having used Stamp, in a word, yes!
OPINION
Is the AKVIS Stamp v3.0 plug-in the useful, powerful tool that AKVIS say it is? Yes. It's also easy-to-use and will speed-up your workflow.
AKVIS COLORIAGE V. 2.0
After using AKVIS Stamp to successfully remove the eyeglasses then fix the "dark patch" problems, the photo was then colourized using AKVIS Coloriage v. 2.0 plug-in. Afterwards Paint Shop Pro 9 was used to add subtle "cheek" highlights to either side of the young lady's face. Finally a couple of PSP9 tools were used to improve the photo's overall clarity. Unless the original colours are known, or the owner requests specific colours, the photo subject, and the mood it's intended to convey will generally dictate colour choice.
THE COLOURIZED VERSION
Image 04 is the final AKVIS Coloriage v2.0, colourized version. Image 05 is the same photograph, but with slightly desaturated colours. This subtle adjustment was made using Paint Shop Pro 9's colour saturation control.

|

|
| Image 04 | Image 05 |