Kansas City - a Desktop Wallpaper
The example was made in the old version of AKVIS LightShop.
Read how to use the current version of the program.
The author of the example is Craig Deutscher. He writes:
In Kansas City there is a good old Christmas tradition - to decorate the city square known as the Plaza with festive lights. The author of the tutorial shows us how he made desktop wallpaper out of a picture he had taken at the Plaza several years ago.
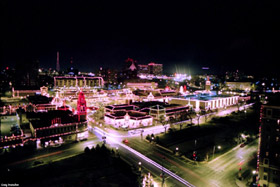

This example has been made in Adobe Photoshop Elements.
- Step 1. Open the image in your photo editor.

- Step 2. Add the inscription. For this purpose create a new layer, type "Kansas City" in a large font and center the inscription on the upper part of the picture.
Choose the Horizontal Type Tool from the Toolbox and set the parameters of the font (Craig used the Pristina font and the blue color).

- Step 3. Now let's add depth to the inscription.
First imitate a shadow. Copy the layer with the text: Layer -> Duplicate layer, change the color of the text to red, an move it slightly up and to the left to create an effect of depth.

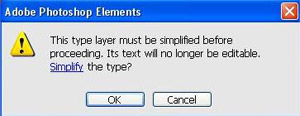
Now add texture to both inscriptions. Call AKVIS ArtSuite from the main menu: Filter -> AKVIS -> ArtSuite. (Your photo editor may ask you if you want to proceed, as the text layer will then become simplified. Click "OK".)
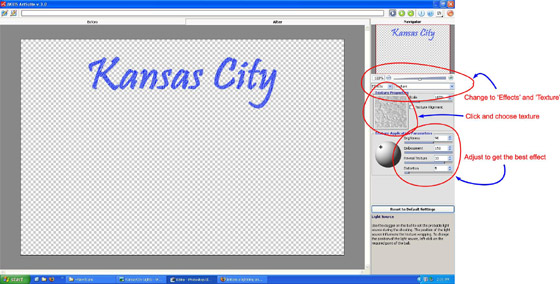
In the Panel setting, under the navigator window, choose Effects from the left drop-down menu, and Texture from the right drop-down menu. Choose the appropriate texture from the Texture library. To open the Texture Library, double click with the left mouse button on the square box with a texture.
Adjust the texture application parameters (Brightness = 90, Embossment = 150, Reveal Texture = 33, Distortion = 5) and press the button
 to start the processing.
To make the adjustment of the settings easier, use the Autorun mode
 . When this mode is activated, the image is processed automatically every time you change the settings.
° When satisfied with the result, click on
 to apply the result and close the plugin window.
Do the same with the second inscription. Here is the result after processing the layers:

- Step 4. Merge two text layers: Layer -> Merge Down.
- Step 5. Add a light effect using AKVIS LightShop. Call AKVIS Lightshop from the main menu Filters -> AKVIS -> LightShop.
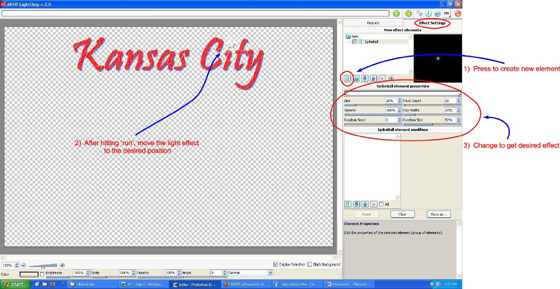
Switch to the Effect Settings tab and press the button Add Element
 . Choose the Estrela pontiaguda element in the awindow that has appeared and press the button OK.
Set the values of the parameters for this element: Size = 20%, Opacity = 100%, Número casual = 0, Raios count = 20, Ray width = 20%, Random size = 50%. Brightness = 100%, Size = 100%, Opacity = 100%, Angle = 0, Blend mode - Normal.
Again press the button
 to create the effect with the specified parameters. Move the effect into the center of the point in the letter i, as if the luminescence is coming out of the text.
Press the button
 .
.
- Step 6. We need to add one more light effect. Again call AKVIS LightShop.
Click to place an additional element and press the button New element
 . In the opened window choose the element Partículas.
Set the values of the parameters: Size = 100%, Opacity = 100%, Número casual = 0, Partículas count = 100, Partículas size = 25%. Brightness = 100%, Size = 100%, Opacity = 100%, Angle = 90, Blend mode - Normal.
Press the button
 to start the process.
Move the effect into the center of the first effect. Enable the Black background check-box to see the elements of the light effect on a black background.
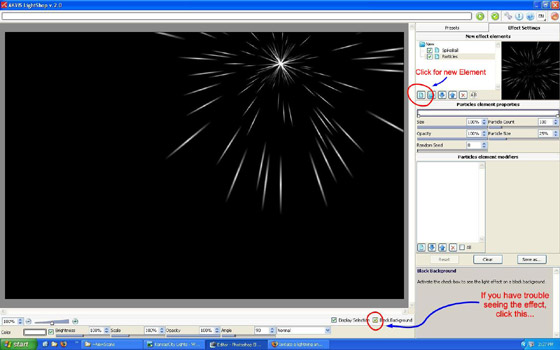
If you are satisfied with the result, click on
 to close the plugin window.
Here is the result:

- Step 7. Now let's paint over the effect to make it more realistic. We have to select each "spark". For quick selection click on the layer icon in the Layers window keeping the Ctrl pressed (
 in Mac).

Now both the light effect and the text are selected. We have to remove the text from the selection, as we do not need to color it. The easiest way is to use the Quick Mask mode. Click the Quick Mask mode button in the Toolbox.
Activate the Brush tool to paint over the inscription.
Switch to the Standard mode. You see that only the rays of the light effect are now selected.

- Step 8. Paint over the rays using the Brush tool. Choose a color with the Color Picker. Press the Set Foreground Color button and the color palette will appear (press the Set Foreground Color button on the tool box).

Deselect the area. Now we have a nice desktop wallpaper!

