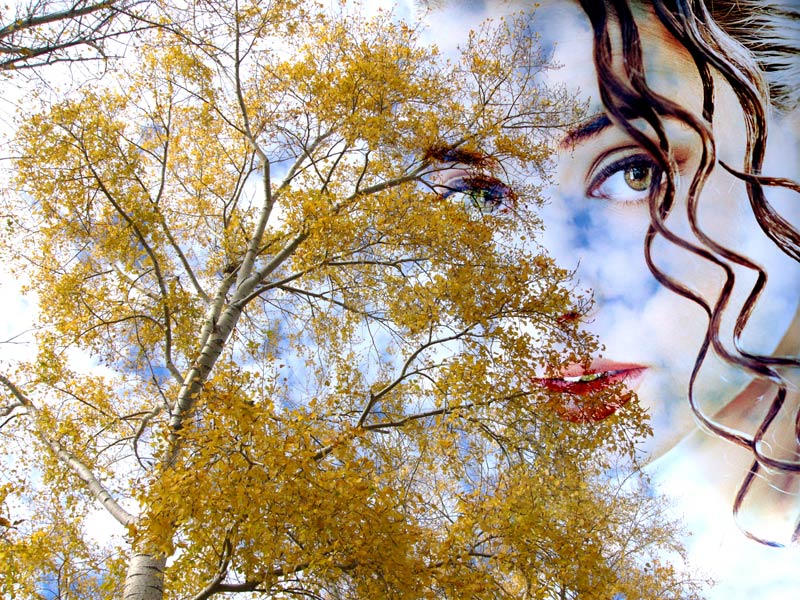
Autumn collage
We have chosen these two photos to create a photo collage: a photo of a poplar against the autumn sky and a photo of a charming girl.
We open the photos in AliveColors.


First we go to the photo of the girl and call the command Edit –> Transform –> Flip Horizontal to mirror the portrait vertically.
Then select this picture with Ctrl+A.
Call AKVIS -> Chameleon – Grab Fragment from the Effects menu of the photo editor.
If everything is done correctly you’ll see a message that the selected fragment is saved into the clipboard.
Next open the photo of the poplar and call AKVIS -> Chameleon – Make Collage from the menu Effects.
The AKVIS Chameleon window will open. This window will contain the background image and the pasted object.
Select Blend mode from the drop-down menu in the Settings Panel.
Use the Transform tool from the Toolbar to change the size, the position, and the rotation angle of the pasted fragment on the background image. You can mirror a girl using this tool if you didn’t in AliveColors.
Press the button ![]() to begin the collage creation process. If you are satisfied with the result, press the button
to begin the collage creation process. If you are satisfied with the result, press the button ![]() to apply the collage to the photo. The plug-in window will close and the photo will appear in the photo editor.
to apply the collage to the photo. The plug-in window will close and the photo will appear in the photo editor.

The steps above can be achieved in the standalone version of AKVIS Chameleon if you do not have an image editor to use the plugin. The step below is an additional improvement made in the image editor.
We think the photo collage will look better if we make it a bit lighter with the Levels command. But before applying this command we should merge the layers, otherwise the command will be applied only to the layer with the girl.
Well, first we call the command Layers -> Merge All, then select the command Adjustment -> Levels in the menu Image. In the Levels dialog box we move the slider of the white point to the left to approx 200 and press the button OK.

As a result we have the following photo collage: a poplar, a blue sky and the contour of the girl’s face.
Chameleon v. 12.1 - 10日間の評価期間

